We have seen the bitmap modes on the GBA which are relatively simple and very flexible. We can put any pixel we want on the screen whenever we want. The downside of the tile modes is that the GBA is too slow to update every pixel (or even a majority of the pixels) each frame.
The tile-based modes do have the ability to update each pixel on the screen every frame, but the catch is we lose some flexibility. We can't put any pixel we want on the screen, we have to use a scrolling tile map.
The idea of a scrolling tile map works well for many games, however. Both top-down and side-scrolling games can use a scrolling background:
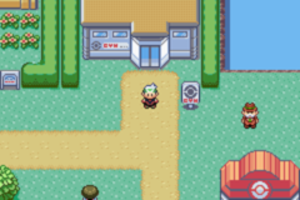

The idea behind the tile modes is that we set up the background(s) ahead of time, and tell the hardware how much to scroll the background horizontally and vertically, and the hardware determines the final position of each pixel.
The GBA has three different tile modes available:
Mode 0
There are 4 available tiled backgrounds, but none of them can be rotated or scaled.
Mode 1
There are 3 available tiled backgrounds, but one can be rotated and scaled.
Mode 2
There are 2 available tiled backgrounds, but both can be rotated and scaled.
We will start with mode 0, and not rotate or scale any of our backgrounds for now. The rotating and scaling are done with transformation matrices and requires a little linear algebra.
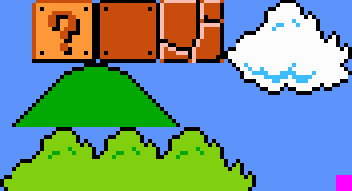
The idea behind using tiles is that we group pixels into 8x8 squares called tiles. We can make an image that contains all of the 8x8 tiles we will need at a time. For example, to create a simple Mario World level, we could use this image:

Here is the same image blown up 400%:
This is made up of the following 8x8 tiles:
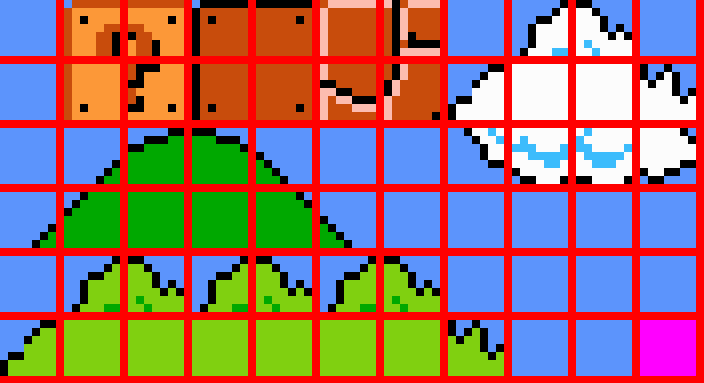
The purpose of the magenta square in the lower right is to serve as a transparent tile. If we put this tile onto our map then the tile will be invisible and show whatever is behind. This is only useful when we have more than one background at a time.
The tile map then is simply an array of numbers where each number refers to an index in this tile image. For instance to create a portion of a map like this:

We would create the tile map as:
0    0    0
0    1    2
0    12   13
Each value in the tile map is an index into the tile image. This way, the tile image only stores each tile we will need once, and we can repeat them as often as needed.
Note that larger objects can be made. The player will see the '?' box as one object when it is in fact made up of four GBA tiles.
The tile modes arrange the GBA video RAM in a totally different manner from the bitmap modes. In the bitmap modes, the video RAM represents the screen which is an array of pixels, perhaps using a palette.
In the tile modes, the video RAM is broken into a number of "character blocks" which are used for storing image data, and a number of "screen blocks" which are used for storing tile map data.
Each character block is 16 kilobytes large, and each screen block is 2 kilobytes large. There are 4 character blocks and 32 screen blocks, and they are actually overlaid, so the video RAM in tile modes looks like this:
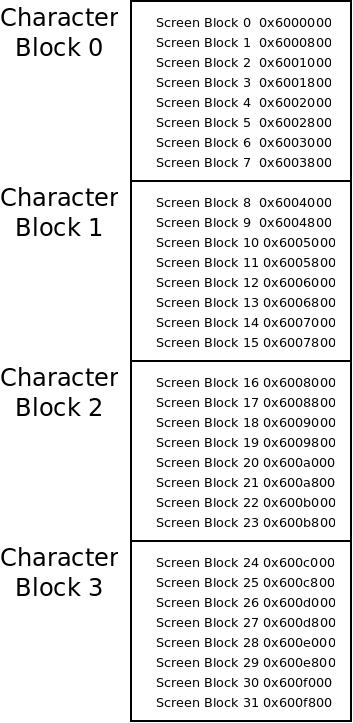
If we store our image data at character block 0, we cannot store our tile map at screen block 0 because they use the same memory addresses!
In order to keep these addresses straight, we can use the following functions to calculate the address of a character block or a screen block:
/* return a pointer to one of the 4 character blocks (0-3) */
volatile unsigned short* char_block(unsigned long block) {
    /* they are each 16K big */
    return (volatile unsigned short*) (0x6000000 + (block * 0x4000));
}

/* return a pointer to one of the 32 screen blocks (0-31) */
volatile unsigned short* screen_block(unsigned long block) {
    /* they are each 2K big */
    return (volatile unsigned short*) (0x6000000 + (block * 0x800));
}
These just figure out how far past the base VRAM address the screen block or character block is.
So how would one actually build the tile map? You could use a plain text editor to enter the tile indices, but that would become tedious quickly. You can instead use a "tile editor" which is a special program designed to enter tile indices.
I could not find a working one which worked with the GBA data formats, so I created a simple one which you can find here. This program should be easy to install on Windows, Mac and Linux.
This is what it looks like:
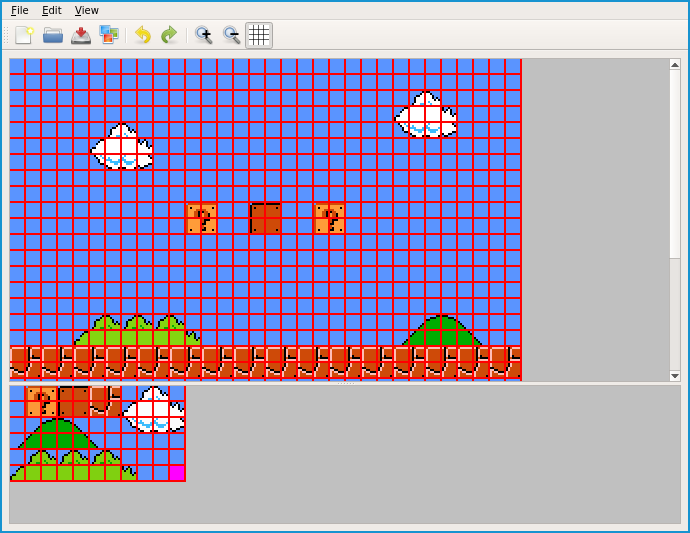
The output of this program is simply a C array of integers giving the offsets of the tiles in the map. The map above is map.h.
Once we have an image containing some tiles, and a tile map which describes how they should be arranged, we can load them into the appropriate sections of memory.
We first need to load the palette:
    /* load the palette from the image into palette memory*/
    for (int i = 0; i < PALETTE_SIZE; i++) {
        bg_palette[i] = background_palette[i];
    }
Then the actual image data:
    /* load the image into char block 0 (16 bits at a time) */
    volatile unsigned short* dest = char_block(0);
    unsigned short* image = (unsigned short*) background_data;
    for (int i = 0; i < ((background_width * background_height) / 2); i++) {
        dest[i] = image[i];
    }
Images used with the tile modes must be created with a palette. This can be done with the '-p' option to png2gba. They also must be written in tile order which means tile by tile instead of row by row. The png2gba program will do this for you with the '-t' option. So the image above was converted with:
$ png2gba -p -t background.png
We wrote the image data into char block 0. This means we can't use screen block 0 for our tile map. Instead we put it starting at screen block 16:
    /* load the tile data into screen block 16 */
    dest = screen_block(16);
    for (int i = 0; i < (map_width * map_height); i++) {
        dest[i] = map[i];
    }
We are almost ready for a full example, but first we need to turn the tile map on. To do this, we must set the display control register to tell the GBA that we are using a tile map, and background 0.
Recall that the following defines can be used to indicate bit positions of the display control register:
/* the three tile modes */
#define MODE0 0x00
#define MODE1 0x01
#define MODE2 0x02

/* enable bits for the four tile layers */
#define BG0_ENABLE 0x100
#define BG1_ENABLE 0x200
#define BG2_ENABLE 0x400
#define BG3_ENABLE 0x800
For this example, we will use mode 0 with one background, number 0. In main we set the display control register as:
/* we set the mode to mode 0 with bg0 on */
*display_control = MODE0 | BG0_ENABLE;
However, we also need to tell the GBA about our tile map especially. It needs to know where the data is, what size it is etc. This is done using a control register for each of the four backgrounds. These can be defined as:
/* the control registers for the four tile layers */
volatile unsigned short* bg0_control = (volatile unsigned short*) 0x4000008;
volatile unsigned short* bg1_control = (volatile unsigned short*) 0x400000a;
volatile unsigned short* bg2_control = (volatile unsigned short*) 0x400000c;
volatile unsigned short* bg3_control = (volatile unsigned short*) 0x400000e;
Each of these control registers contain a number of bit-fields for specifying how the tile map should work:
| Fields | Size | Wrap | Screen | Color Mode | Mosaic | Unused | Character | Priority |
| Bits | 15 14 | 13 | 12 11 10 9 8 | 7 | 6 | 5 4 | 3 2 | 1 0 |
Size
The size of the tiled background. These are different depending on whether the background is regular or affine (can be rotated scaled):
| Value | Regular Size | Affine Size |
| 0 | 32 by 32 | 16 by 16 |
| 1 | 64 by 32 | 32 by 32 |
| 2 | 32 by 64 | 64 by 64 |
| 3 | 64 by 64 | 128 by 128 |
Wrap
Whether the background should wrap on the edges.
Screen
Which screen block number the tile map data is stored in.
Color Mode
Whether the color data is 16 colors (color mode 0) or 256 colors (color mode 1). The png2gba program does not support 16 colors, though it would save space to use that.
Mosaic
Enables a mosaic effect for the background.
Character
Which character block the image data for this background is stored in.
Priority
The priority determines the draw order for the background. Priority 0 will be drawn on top of everything else, then priority 1, then 2, then 3. This is used when multiple backgrounds are layered on each other.
The following code sets all of these for the example tile map program:
/* set all control the bits in this register */
*bg0_control = 0    |   /* priority, 0 is highest, 3 is lowest */
          (0 << 2)  |   /* the char block the image data is stored in */
          (0 << 6)  |   /* the mosaic flag */
          (1 << 7)  |   /* color mode, 0 is 16 colors, 1 is 256 colors */
          (16 << 8) |   /* the screen block the tile data is stored in */
          (1 << 13) |   /* wrapping flag */
          (0 << 14);    /* bg size, 0 is 256x256 */
The great thing about the tiled backgrounds is that once we have them all set up, scrolling them is easy! There are two hardware registers that control the scrolling for each of the four backgrounds: one for horizontal scrolling and one for vertical.
The addresses of each of these are given below:
volatile short* bg0_x_scroll = (volatile short*) 0x4000010;
volatile short* bg0_y_scroll = (volatile short*) 0x4000012;
volatile short* bg1_x_scroll = (volatile short*) 0x4000014;
volatile short* bg1_y_scroll = (volatile short*) 0x4000016;
volatile short* bg2_x_scroll = (volatile short*) 0x4000018;
volatile short* bg2_y_scroll = (volatile short*) 0x400001a;
volatile short* bg3_x_scroll = (volatile short*) 0x400001c;
volatile short* bg3_y_scroll = (volatile short*) 0x400001e;
Each of these registers is write-only which means that you cannot read the current scroll value. You also can't use things like the '+=' operator to increment them because that involves reading the current value.
To scroll background 0 with the arrow keys, we can use the following code in main:
/* set initial scroll to 0 */
int xscroll = 0;
int yscroll = 0;

/* loop forever */
while (1) {
    /* scroll with the arrow keys */
    if (button_pressed(BUTTON_DOWN)) {
        yscroll++;
    }
    if (button_pressed(BUTTON_UP)) {
        yscroll--;

    }
    if (button_pressed(BUTTON_RIGHT)) {
        xscroll++;
    }
    if (button_pressed(BUTTON_LEFT)) {
        xscroll--;
    }

    /* wait for vblank before scrolling */
    wait_vblank();
    *bg0_x_scroll = xscroll;
    *bg0_y_scroll = yscroll;

    /* delay some */
    delay(50);
}
We need to maintain our own variables for the scroll amounts, and write those to the scroll registers. Note that this should only be done during the VSYNC period. If we change the scroll half way through the screen draw process, we could get tearing.
Also note we need to delay this program a little bit. The tile scrolling is all done in hardware, so this program has no trouble keeping up. We would not want to actually scroll 60 pixels per second, so this slows us down. The delay function is just written as:
/* just kill time */
void delay(unsigned int amount) {
    for (int i = 0; i < amount * 10; i++);
}
The complete tile program is available here. The tile modes require more setup work than the bitmap modes. We must:
But once this is done, the only thing we need to do is set the scrolling amounts we want. The main loop of this program does very little work compared to a bitmap mode program. The actual displaying of pixels is done all in hardware!
In a real game, we would use all this CPU time to implement our actual game logic. The hardware is in charge of the actual graphics and the CPU is in charge of game logic - and telling the hardware info it needs like how much scrolling to apply.
At this point we can create multiple tiled backgrounds which can all scroll in two dimensions, but just backgrounds does not make for an exciting game. In order to have characters, we will need the GBA hardware sprites.
These are quite similar to tiled backgrounds in concept. We have a number of sprites (256) which we can turn on, and give image data and positions. Then the GBA draws them in hardware. We will look at these next week!
Copyright © 2024 Ian Finlayson | Licensed under a Attribution-NonCommercial 4.0 International License.