Using Git to Collaborate with Others
Overview
Large software projects are the result of collaboration between dozens, hundreds, or even thousands of programmers over time. It would not be feasible for them to share code by emailing it back and forth, or using a service like Dropbox.
Instead, programmers use version control systems, such as Git, to track their changes and handle combining their code into one product. We looked at how Git can be used to track changes to projects one person is working on in Week 5. This week we will look at how Git can be used to collaborate with a team of programmers.
This will be helpful as you work on bigger group projects in computer science courses, and necessary if you are employed as a software developer.
Using a Central Repository
While it is possible to use Git with multiple users with each only having their own repository, it is generally easier to have a central repository where each user sends their changes and receives others changes:
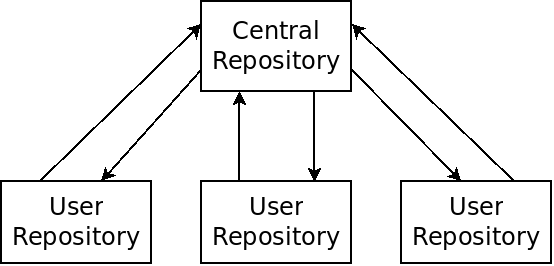
Diagram of a central Git Repository
Here there is one Git central repository which is used by all programmers working on the project. Each user also has their own repository of the project. Each repository stores essentially the same information: the state and history of all files included in the project.
The users each work on their own local repository. Then they can push changes up to the central repository. This allows their team members to in turn pull the changes from the central repository which allows them to receive each others work.
There can of course be conflicts with this setup. If two programmers make incompatible changes to the same file, they will need to merge the changes. However, Git makes this process far easier than the alternative of emailing changes to each other!
Github
It is entirely possible to create your own centralized Git repositories, but it is usually easier and more convenient to use a hosting service instead.
Github is the most popular hosting service for Git. Github allows you to create a centralized repository online, which can be used by multiple people working on a project together.
Github offers two types of repositories:
- Public repositories are accessible to the whole world. Public repositories are free and can have an unlimited number of collaborators.
- Private repositories are only accessible to the people who have been invited to the project. They are free if there are 3 or fewer collaborators. After that, they cost money.
Warning: it may be an honor code violation to post your programming assignments to a public Github repository. They will be visible to other students in your class. You should use a private repository, or check with your instructor before using a public repository!
Making a Github User
This section will show you how to create a Github user. To use Github to collaborate, all team members must create a Github user account, and also to set up SSH keys for use with the site:
Create a User
Navigate to https://github.com/join to sign up for an account. Fill in your details and then click "Create account". You must also verify your email address. Log in to your email and click the verification link. To collaborate with Github, each team member needs their own account.
Create an SSH Key for Github
We have seen that creating an SSH key will allow you to login from your local computer onto the CPSC server without needing a password. Now we use SSH keys to authenticate ourselves with Github.
You must create an SSH key from the CPSC server in order to be able to access it from the command line. You can create an SSH Key using the following command:
ifinlay@cpsc:~$ ssh-keygen
Just hit the enter key for each question that it asks. This will create files called "~/.ssh/id_rsa" which is your private key, and "~/.ssh/id_rsa.pub" which is your public key.
In week 1, we covered creating SSH keys from your local machine to the CPSC server. Here, we're making SSH keys from the CPSC server to Github.Add the Key to Github
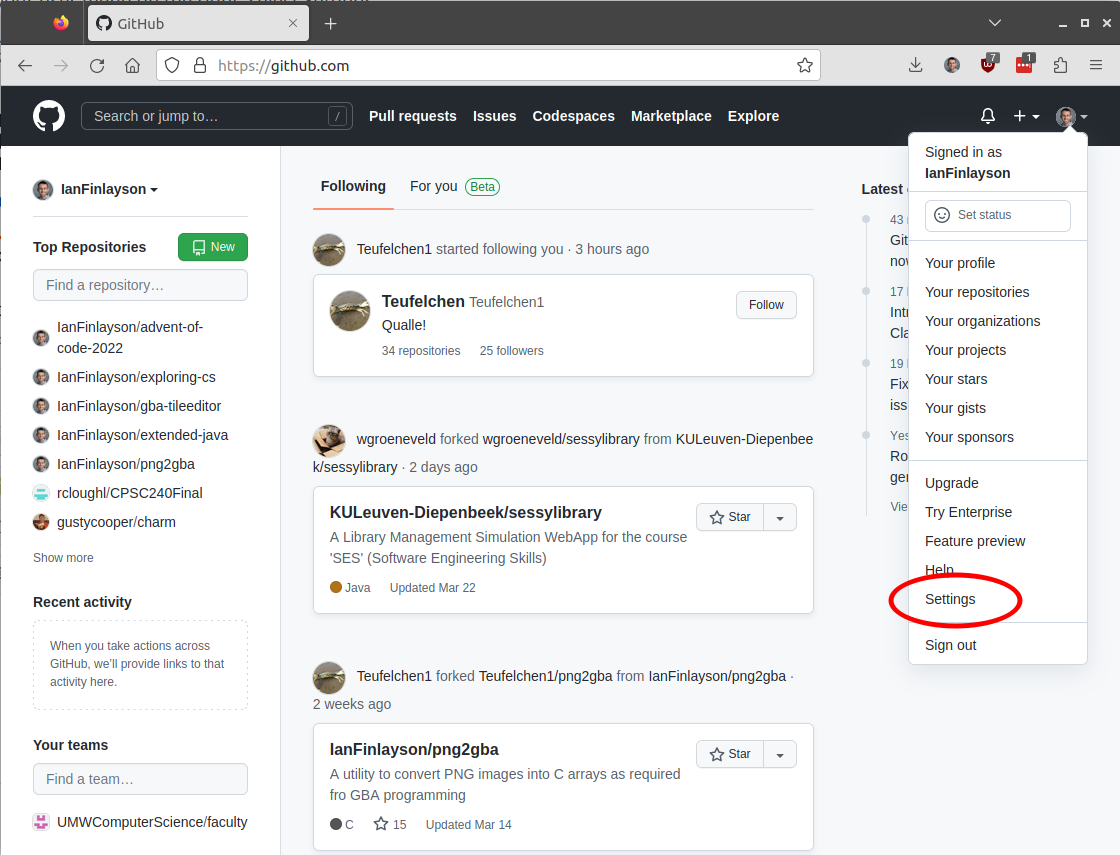
Under your user menu on the right, select Settings:
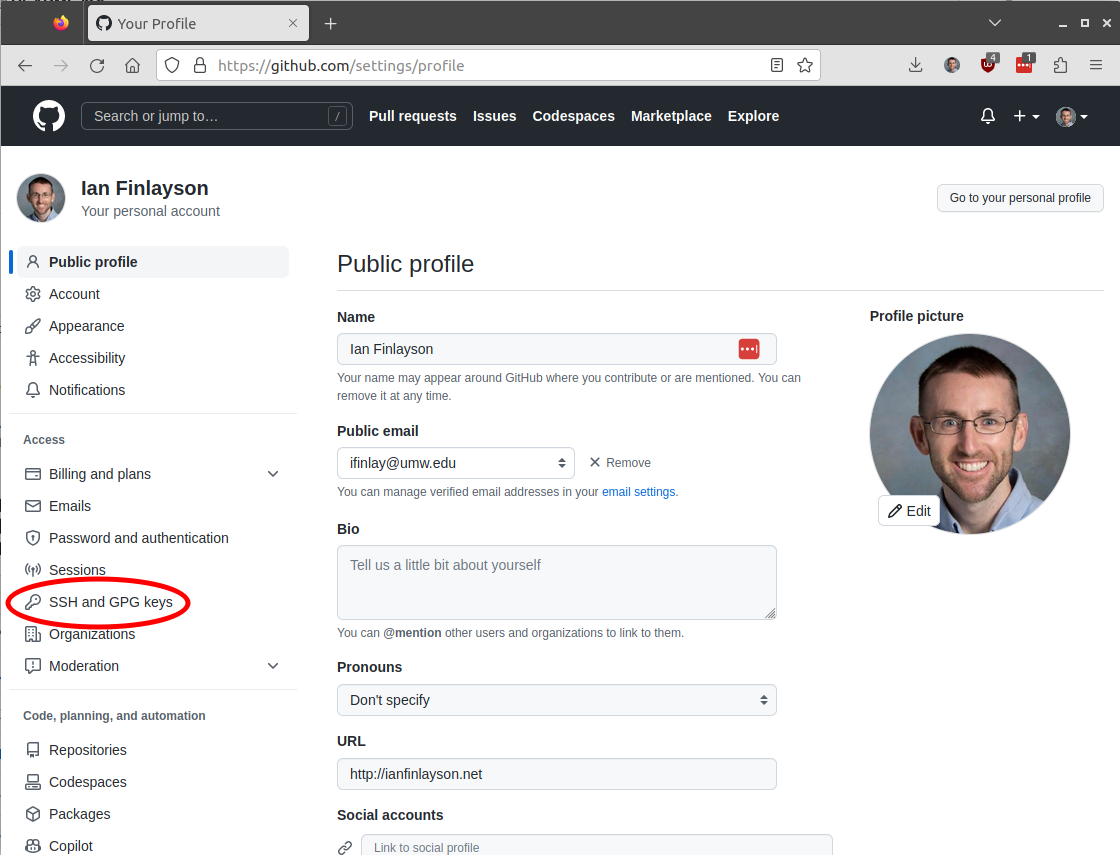
Next click on the "SSH and GPG keys" link on the left:
Then click "New SSH key":
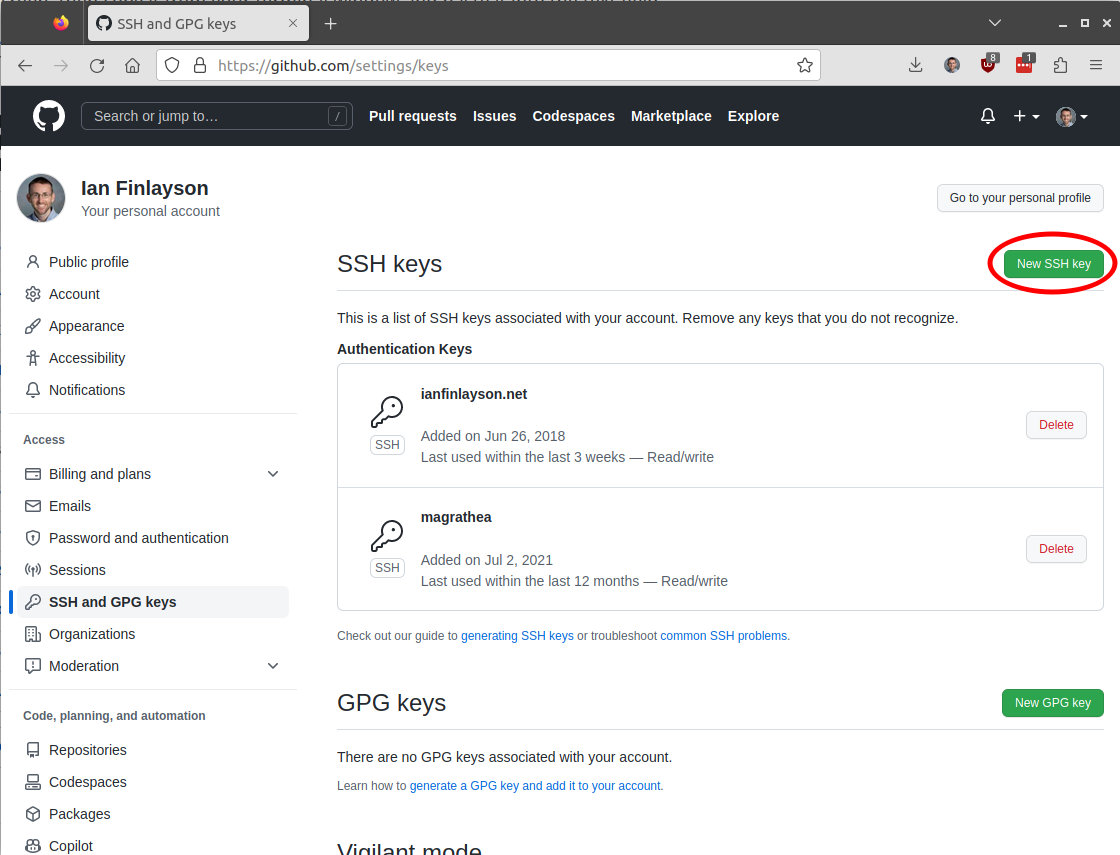
Give it a title for the machine you made it on, then paste the contents of the file "~/.ssh/id_rsa.pub" into the Key section. You can
catthis file to the screen, then copy it from your terminal window and paste it into the text field.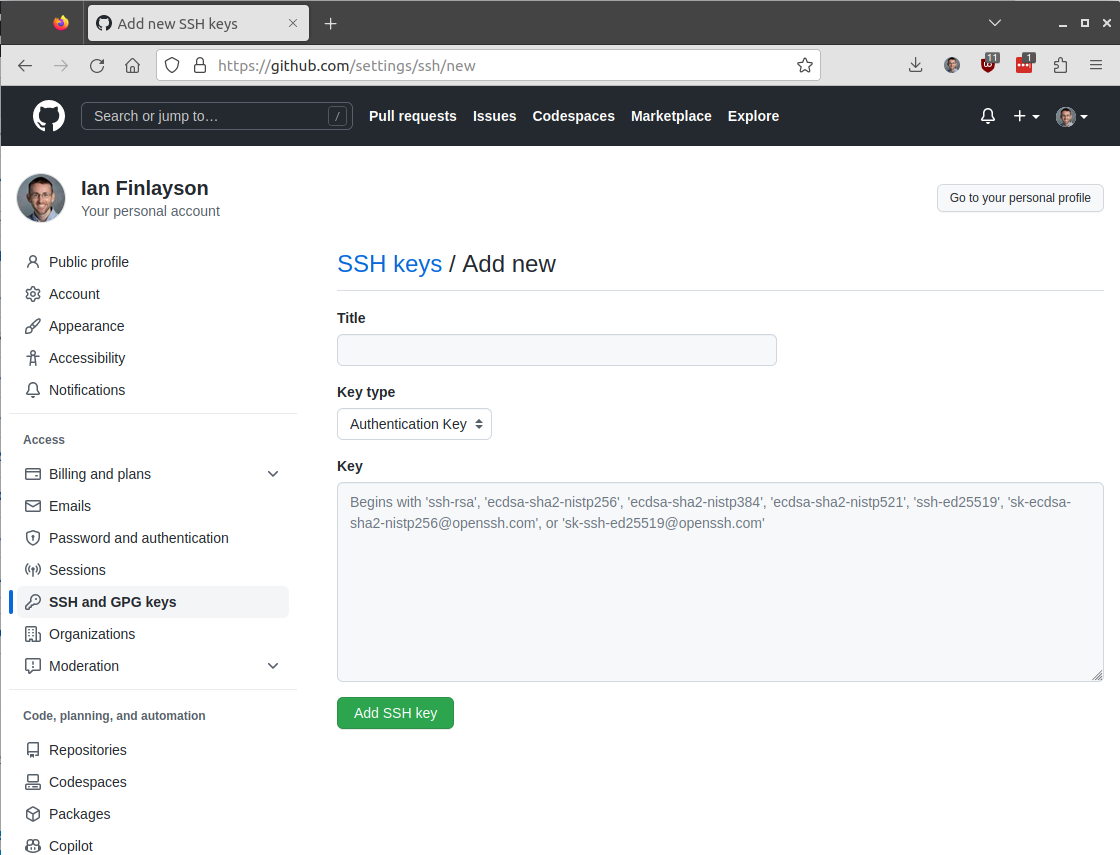
Then click "Add SSH key". You should now have your SSH keys properly set up!
Creating the Central Repository
Only one team member should do this. The central repository is shared amongst all members, but is only created once.
Create the Repository
Click on the "Start a project" link on the main Github page, or click this link.
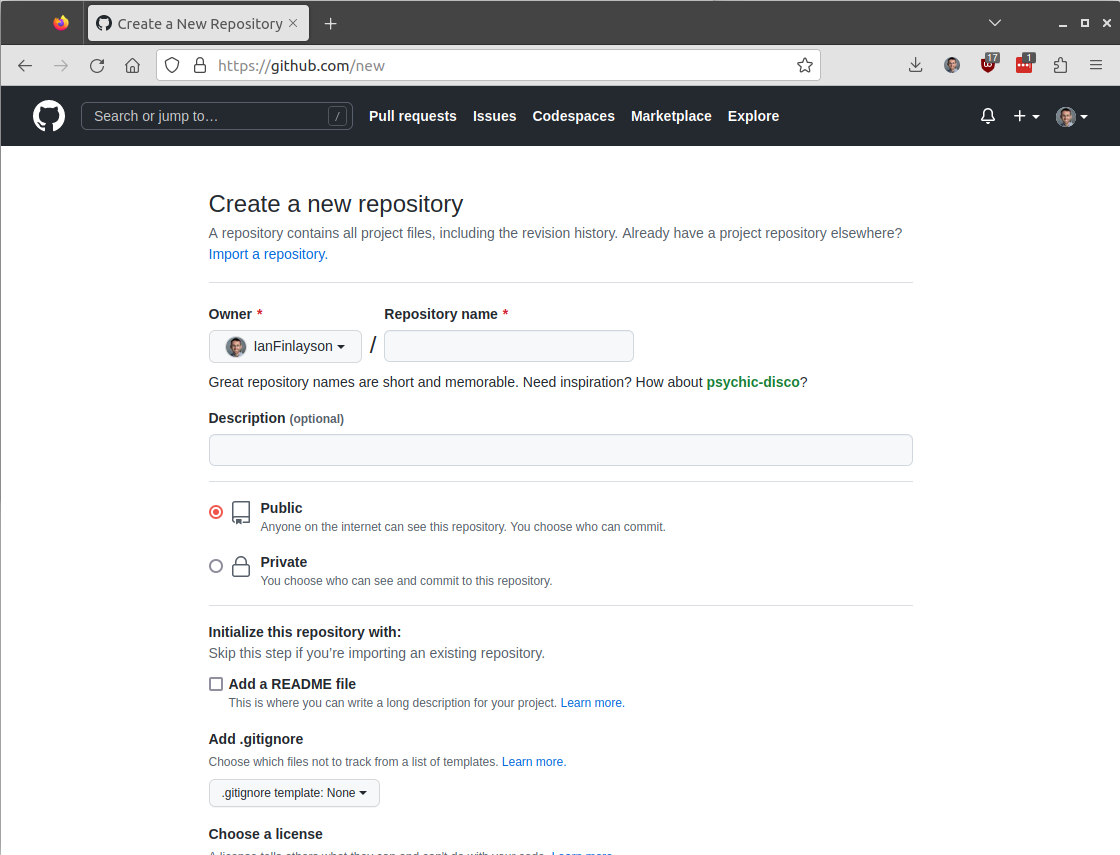
Creating a Github RepositoryPut in a name and a description for your repository, and choose whether the repository should be public or private. You also should check the "Initialize this repository with a README" box. This will put something in the repository to start with so that it can be cloned immediately
You can optionally choose a default .gitignore file. Recall that the purpose of this file is to tell Git which files it should not be tracking. If you add a .gitignore for a certain language, Github will give you a default one. For instance, if you select one for Java, it will include all .class files.
You can also optionally select a license for your work. Then click the "Create Repository" button. This creates the central repository which all team members will use to share their work.
Invite Collaborators
The next step in using Github to collaborate is to have the person who created the repository to invite the fellow team members to join the project. This will allow them to write changes to the repository as well.
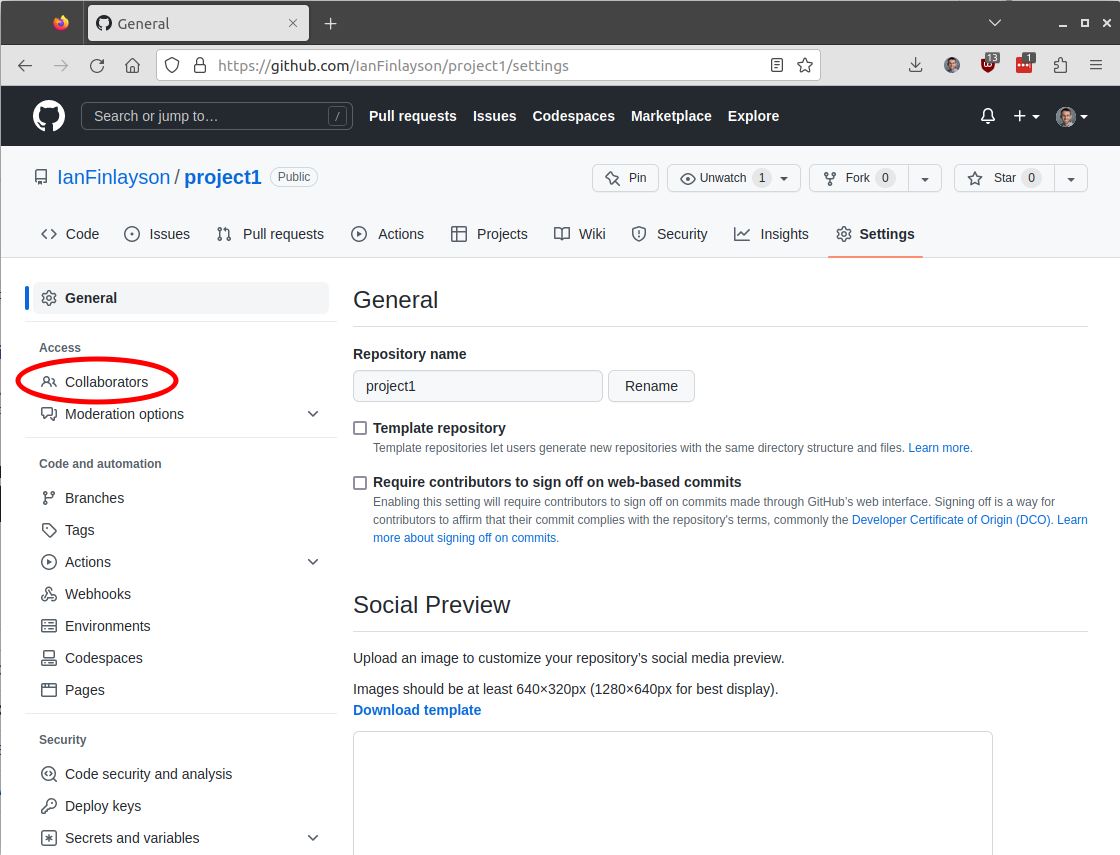
On the project page, click "Settings":

Then click on the "Collaborators" tab on the left:
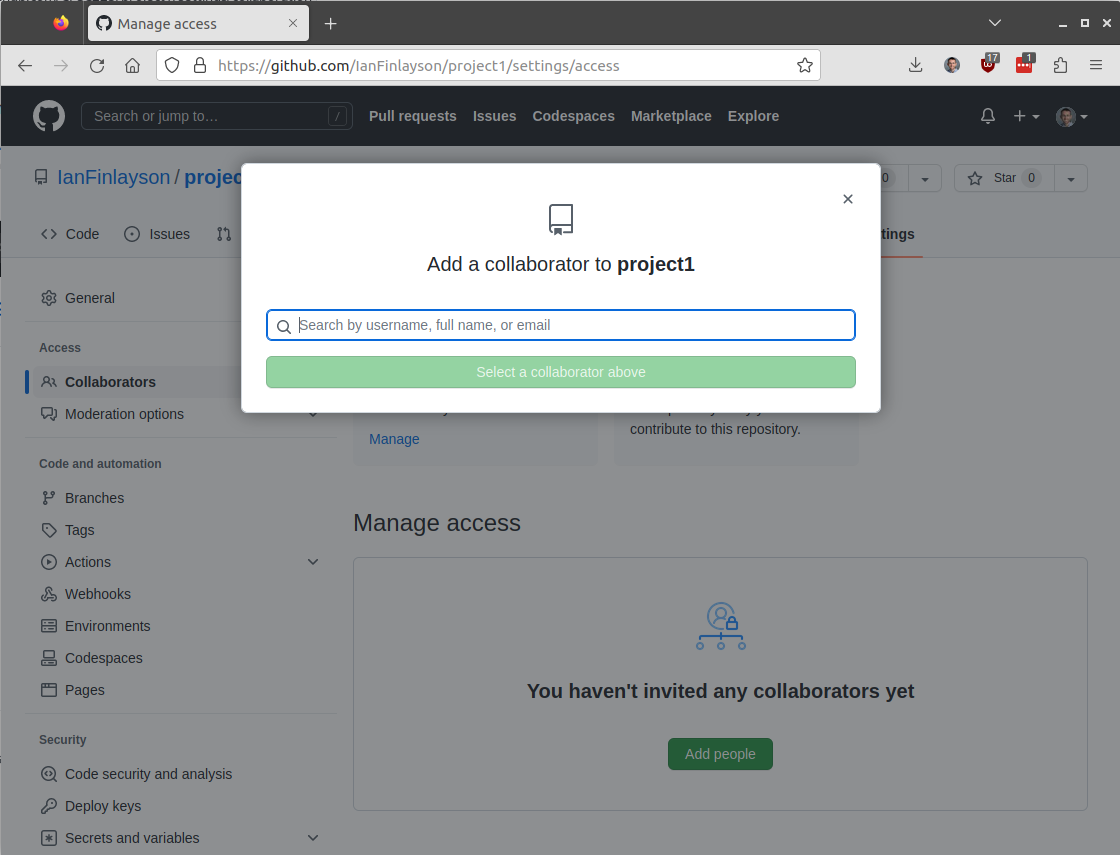
Now, click "Add people" button to search for a collaborator. The person you wish to add must have a Github account.
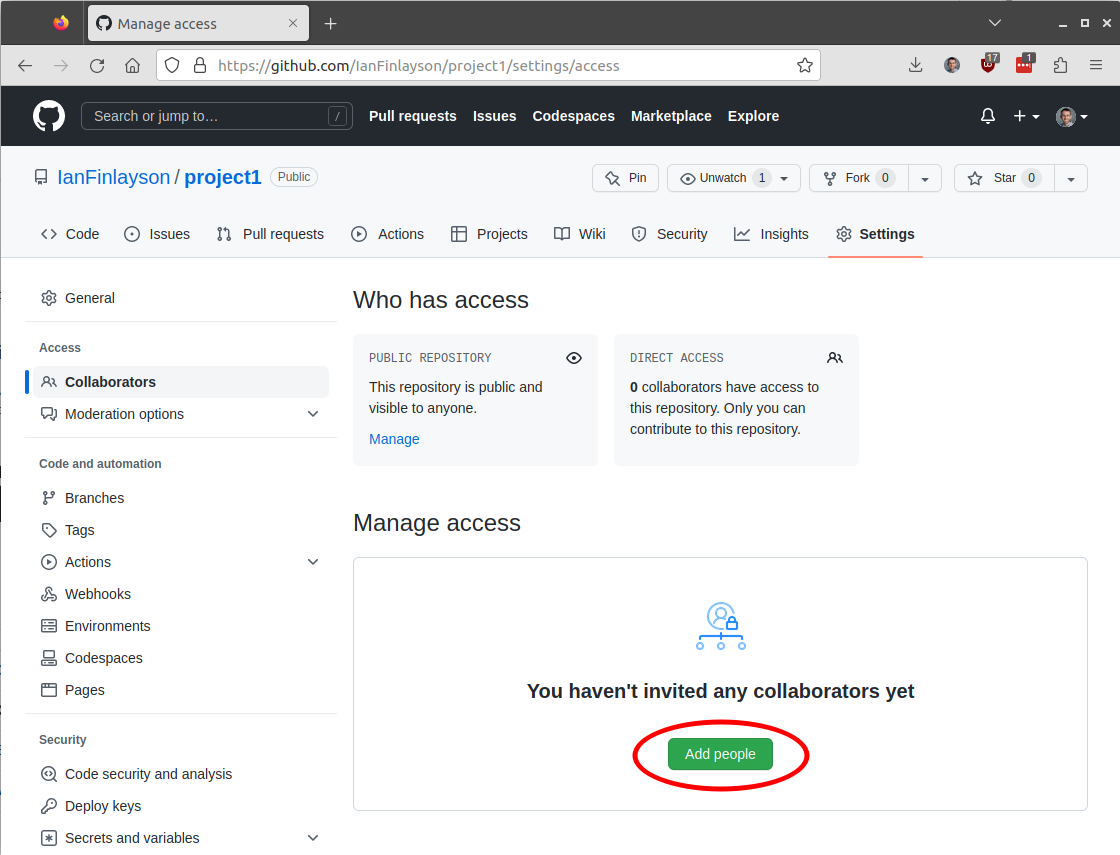
Put in the person's email or Github user name to search for them.
They will receive an email asking them to accept the invitation. Once they do, they should be given access to the repository.
Clone the Repository
Now each team member should be able to clone the repository which will give them their own local copy and the ability to push changes to the central one.
To do this, go to the project page, and click the "Code" button. Then ensure that it is on the "Local" tab, and then the "SSH" tab under that.
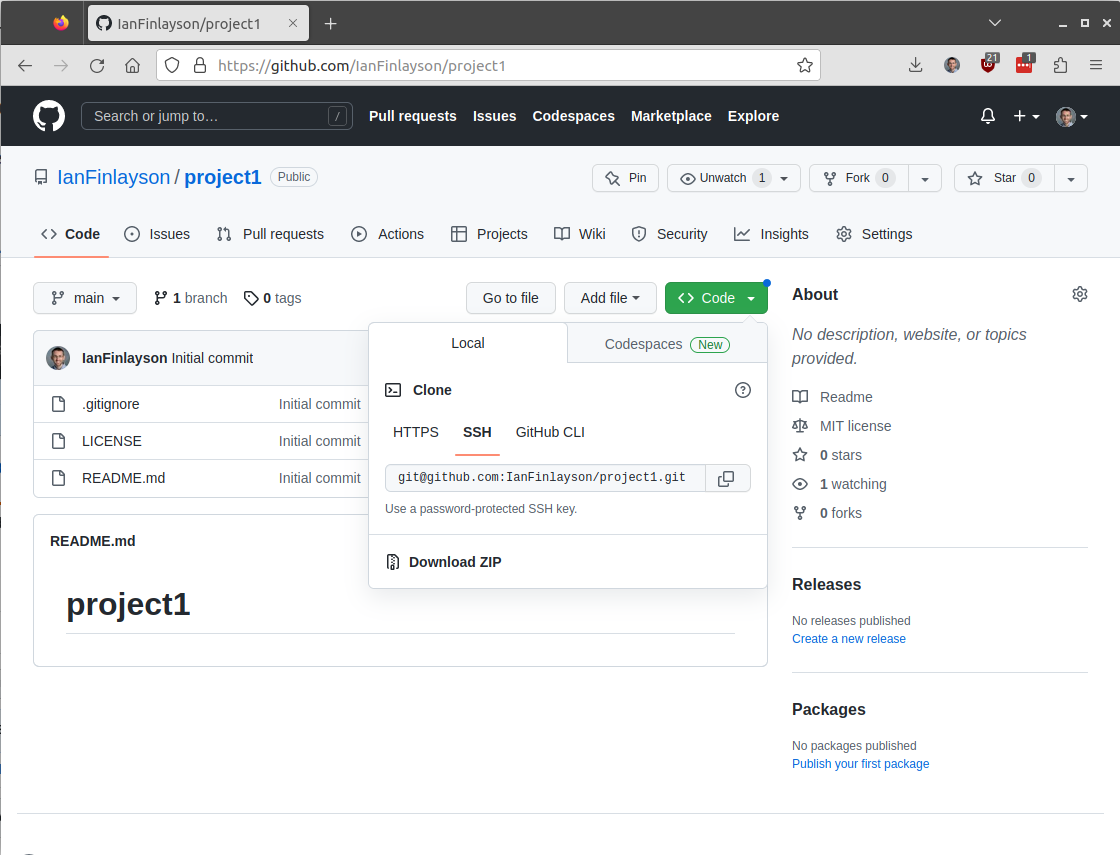
Copy the text starting with "git@github.com". Then go to the terminal, and
enter the command git clone, then paste in the text from Github:
ifinlay@cpsc:~$ git clone git@github.com:IanFinlayson/project1.git
Cloning into 'project1'...
remote: Counting objects: 3, done.
remote: Total 3 (delta 0), reused 0 (delta 0), pack-reused 0
Receiving objects: 100% (3/3), done.
Now each user should have a local copy of the project repository as well as the ability to push and pull from the centralized one. The Github web interface also provides an interface to the log and revision history of your project.
Pushing Changes
Now each team member can add their changes. For instance, we can add a new file, and commit the change as we have already seen:
ifinlay@cpsc:project1$ vim main.py
ifinlay@cpsc:project1$ git add main.py
ifinlay@cpsc:project1$ git commit -a
[master bad9466] Added a simple hello world file
 1 file changed, 2 insertions(+)
 create mode 100644 main.py
Now we can push the changes to the centralized repository with
git push:
ifinlay@cpsc:project1$ git push
Counting objects: 3, done.
Delta compression using up to 8 threads.
Compressing objects: 100% (2/2), done.
Writing objects: 100% (3/3), 314 bytes | 314.00 KiB/s, done.
Total 3 (delta 0), reused 0 (delta 0)
To github.com:CPSC225/project1.git
   92e6d26..bad9466  master -> master
Now the commit is on the central repository as well. We can push multiple commits at once. A good rule of thumb is to have each team member commit as they work and make progress, but only push when they want their changes available to all.
Pulling Changes
If a team member has pushed changes to the repository, the other members
will want to get them. This can be done with the git pull
command:
ifinlay@cpsc:project1$ git pull
remote: Counting objects: 3, done.
remote: Compressing objects: 100% (3/3), done.
remote: Total 3 (delta 0), reused 0 (delta 0), pack-reused 0
Unpacking objects: 100% (3/3), done.
From github.com:CPSC225/project1
   bad9466..bc0b86b  master     -> origin/master
Updating bad9466..bc0b86b
Fast-forward
 main.py | 6 +++++-
 1 file changed, 5 insertions(+), 1 deletion(-)
You should generally perform a git pull
regularly to make sure your repository is up to date with
the central one.
Merging Conflicts
Now that we have multiple users working together, we have the opportunity for them to step on each others toes. Suppose they make incompatible changes to the "main.py" file above.
Suppose user 1 edits main.py so it looks like this:
ifinlay@cpsc:project1$ cat main.py
print("User1 was here!")
At the same time, user 2 edits the file to:
ifinlay@cpsc:project1$ cat main.py
print("User2 was here!")
Now User 1 commits and pushes the change:
ifinlay@cpsc:project1$ git commit -a
[master d2250ba] Committed User 1 Version
 1 file changed, 1 insertion(+), 5 deletions(-)
ifinlay@cpsc:project1$ git push
Counting objects: 3, done.
Delta compression using up to 8 threads.
Compressing objects: 100% (2/2), done.
Writing objects: 100% (3/3), 312 bytes | 312.00 KiB/s, done.
Total 3 (delta 0), reused 0 (delta 0)
To github.com:CPSC225/project1.git
   bc0b86b..d2250ba  master -> master
Next User 2 tries push their change as well:
ifinlay@cpsc:project1$ git push
To github.com:CPSC225/project1.git
 ! [rejected]        master -> master (fetch first)
error: failed to push some refs to 'git@github.com:CPSC225/project1.git'
hint: Updates were rejected because the remote contains work that you do
hint: not have locally. This is usually caused by another repository pushing
hint: to the same ref. You may want to first integrate the remote changes
hint: (e.g., 'git pull ...') before pushing again.
hint: See the 'Note about fast-forwards' in 'git push --help' for details.
We get an error because "the remote contains work that you do not have locally.". To fix this, we must first pull in the changes from the other user:
ifinlay@cpsc:project1$ git pull
remote: Counting objects: 3, done.
remote: Compressing objects: 100% (2/2), done.
remote: Total 3 (delta 0), reused 0 (delta 0), pack-reused 0
Unpacking objects: 100% (3/3), done.
From github.com:CPSC225/project1
   d2250ba..3beef64  master     -> origin/master
Auto-merging main.py
CONFLICT (content): Merge conflict in main.py
Automatic merge failed; fix conflicts and then commit the result.
Here Git tells us of the conflict in main.py. If we open the file, we will see the following:
ifinlay@cpsc:project1$ cat main.py
<<<<<<< HEAD
print("User1 was here!")
=======
print("User2 was here!")
>>>>>>> 3beef64664c39a1809b148cbb8e1fdaf3ad58431
Git marks the sections in each file which conflict. Here we need to edit the file to contain either the line from "HEAD" which is our local version, the line from the commit which is already in the repository, or some compromise. We can edit the file to say:
ifinlay@cpsc:project1$ cat main.py
print("Users 1 and 2 were both here!")
Note that we have to remove the marker lines (the "<<<<<<<", "=======", and ">>>>>>>" ones) put in by Git as well!
Now we can commit this and push to the repository:
ifinlay@cpsc:project1$ git commit -a
[master 821d191] Merge branch 'master' of github.com:CPSC225/project1
ifinlay@cpsc:project1$ git push
Counting objects: 6, done.
Delta compression using up to 8 threads.
Compressing objects: 100% (4/4), done.
Writing objects: 100% (6/6), 662 bytes | 662.00 KiB/s, done.
Total 6 (delta 0), reused 0 (delta 0)
To github.com:CPSC225/project1.git
   3beef64..821d191  master -> master
We have successfully fixed the conflict and merged the commits!
Simple Team Workflow
A simple workflow of using Git in a team might look like this:
git pull- Make sure we are up to date.- Work on the project.
git commit -a- Save our work as we go.git push- Share our work when we want to.- Fix any conflicts which may exist.
- Repeat!