Files and Directories Continued
Relative and Absolute Paths
Last week we looked at the cp and mv commands
and how they can be used to copy and move files around the file
system.
Both of these commands allow you to specify directories as the target. There are two different ways that directories can be specified: with relative or absolute paths.
Relative paths are most commonly used, and it was what we used last week. For instance, the following command copies "file1" into "directory1":
ifinlay@cpsc:~$ cp file1 directory1
When we type "file1" and "directory1", it is relative to our current directory. That means that it looks for them where we currently are at, which in this case was the home directory.
If we were some place else, where there wasn't a "file1", then the command would not have worked the same, as in this example:
ifinlay@cpsc:~$ cd directory2
ifinlay@cpsc:~/directory2$ ls
ifinlay@cpsc:~/directory2$ cp file1 directory1
cp: cannot stat 'file1': No such file or directory
Even though file1 exists (in the home directory), it can't be found, because the path is relative to the present working directory.
We could still make this work with a relative path, but we'd have to specify that file1 and directory1 are up from our current location:
ifinlay@cpsc:~/directory2$ cp ../file1 ../directory1
This demonstrates an important point which is that the meaning of commands depends on which directory we are currently in. So it's important to be aware of where you are! If you notice, the command prompt shows your present directory (between the : and $) because it's so important.
In order for a command to mean the same thing regardless of our location, we could have used an absolute path. Absolute paths always begin with a /, and specify the whole location from the root. For instance:
ifinlay@cpsc:~/directory2$ cp /home/faculty/ifinlay/file1 /home/faculty/ifinlay/directory1
This command will do the same thing regardless of where we are because it includes the whole path to file1 and directory1, it no longer is relative to where we are.
Wild Cards
Wild cards provide a concise way of referencing multiple files when specifying them as arguments to a command. For example, say we have multiple text files with the .txt extension in a directory, and we want to move them all up one directory. We could type them all out:
ifinlay@cpsc:directory$ ls
a.txt  b.txt  c.txt  d.txt  e.txt  f.txt  g.txt
ifinlay@cpsc:directory$ mv a.txt b.txt c.txt d.txt e.txt f.txt g.txt ..
Instead, we can use one of the following wild card characters:
- ? - Matches a single character in a filename.
- * - Matches any number of characters in a filename, including zero.
In the example above, we can use:
ifinlay@cpsc:directory$ ls
a.txt  b.txt  c.txt  d.txt  e.txt  f.txt  g.txt
ifinlay@cpsc:directory$ mv ?.txt ..
to accomplish the same thing, as the "?.txt" wild card will match any single character followed by the .txt extension.
Wild cards do not need to be at the beginning of a filename. If we wanted
to do something with all filenames that begin with "a", and end with "z", we
could use a*z.
If we wanted to do something with all filenames that were exactly two characters long, we could use "??".
Seeing Disk Usage
You can view the disk usage of a directory using the du
command. du takes the directory name as an argument. By
default, du, like ls, does not give easily readable
sizes. To ask it to, we can pass the "-h" flag:
ifinlay@cpsc:~$ du -h projects
12K     projects/project1
16K     projects/project2
32K     projects
As you can see, du gives the sizes for each sub-directory, then
the size of the whole directory itself.
du is useful for seeing which of your directories are taking
up the most space.
Symbolic Links
Unix has a special type of file called a symbolic link which essentially serves as a shortcut to a file or directory somewhere else.
Symbolic links are created with the ln command which can create
symbolic links and also "hard links". Hard links are not as generally useful
and we won't talk about them. Unfortunately they are the default kind of
link, so we need to pass the "-s" flag to tell ln to make a symbolic
link.
The first argument to ln is the file to link to. The
second is the link to create. Its easy to think of it as working just like
the cp command except instead of copying a files contents, it just
makes a link to it.
Below, we create a symbolic link to a file called a.txt:
ifinlay@cpsc:~$ ln -s a.txt b.txt
ifinlay@cpsc:~$ ls *.txt
a.txt  b.txt
The file command can tell what type of file
something is:
ifinlay@cpsc:~$ file *.txt
a.txt: ASCII text
b.txt: symbolic link to `a.txt'
In most ways, the symbolic link and file can be used interchangeably. If we edit one, the changes show up on the other. However, if we delete the link, the original file is unchanged. If we delete the original file, however, the link is useless:
ifinlay@cpsc:~$ rm a.txt
ifinlay@cpsc:~$ file b.txt
b.txt: broken symbolic link to `a.txt'
I often use symbolic links to directories. For instance, this class material is stored in "~/public_html/class/cpsc225/". However, as I'm working on it, I navigate to this directory a lot, so I linked it in my home directory:
ifinlay@cpsc:~$ ln -s public_html/class/cpsc225 225
ifinlay@cpsc:~$ cd 225
This lets me jump into a deep directory more easily.
Creating Archives
Sometimes you may want to archive multiple files together, such as to submit an assignment consisting of multiple files, or to create a backup, similarly to how you might use ".zip" files in other systems.
This can be done with the tar command under Unix. tar requires one option which tells it which function to perform. Possible function options include:
-c
Create a tar archive.
-t
List the files in a tar archive.
-x
Extract the contents of a tar archive.
tar also requires the "-f" option which specifies the
tar file to use for the command.
The following command will create a tar archive called "archive.tar" with the files file1, file2 and file3:
ifinlay@cpsc:test$ ls
file1  file2  file3
ifinlay@cpsc:test$ tar -c -f archive.tar file1 file2 file3
ifinlay@cpsc:test$ ls
archive.tar  file1  file2  file3
Multiple short options for a command can be combined, so we could also write the above tar command as:
ifinlay@cpsc:test$ tar -cf archive.tar file1 file2 file3
By default tar does not compress the files in the archive, but just joins them together (along with information on the file name, owner, creation time, permissions and so on). One handy feature of tar is that it preserves this information in the tar archive.
If we want to compress the tar archive, we can use the "-z" option. Normally these files are given the ".tar.gz" extension to show that they are compressed. We can use the following command to create a compressed tar archive:
ifinlay@cpsc:test$ tar -czf archive.tar.gz file1 file2 file3
ifinlay@cpsc:test$ ls
archive.tar.gz  file1  file2  file3
We can use the "-t" flag to list the contents of a tar archive:
ifinlay@cpsc:test$ tar -tf archive.tar.gz
file1
file2
file3
We can extract the archive with the "-x" flag:
ifinlay@cpsc:test$ ls
archive.tar.gz
ifinlay@cpsc:test$ tar -xf archive.tar.gz
ifinlay@cpsc:test$ ls
archive.tar.gz  file1  file2  file3
The examples above all use single files when creating the archive, but tar
can be passed entire directories as well. If we wanted to create a
compressed archive of a "~/projects" directory, this could be done:
ifinlay@cpsc:test$ tar -czf projects.tar.gz ~/projects
One commonly used option for tar is the "-v" flag which
stands for verbose. It tells tar to print the names of the
files which it is adding to, or extracting from, the archive as it works.
Compressed tar archives are commonly referred to as "tarballs".
If you do need to create a .zip file, you can use the zip
command for this:
ifinlay@cpsc:test$ zip archive.zip file1 file2 file3
  adding: file1 (stored 0%)
  adding: file2 (stored 0%)
  adding: file3 (stored 0%)
ifinlay@cpsc:test$ ls
archive.zip  file1  file2  file3
The first argument is the name of the output file, and subsequent arguments are files to put in the .zip.
Likewise, you can decompress a .zip file with the unzip command:
ifinlay@cpsc:test$ unzip archive.zip
Archive:  archive.zip
 extracting: file1
 extracting: file2
 extracting: file3
Downloading Files
Sometimes you will need to download a file to the CPSC server from some place on the
internet. This can be done with the wget command. This command has
several advanced options which allow you to, for instance, download entire
websites for offline usage. The basic usage however is quite simple. If you
wanted to download this very web page, you could do it as follows:
ifinlay@cpsc:test$ wget "http://ianfinlayson.net/class/cpsc225/notes/03-files2"
--2018-07-31 12:17:38--  http://ianfinlayson.net/class/cpsc225/notes/03-files2
Resolving ianfinlayson.net (ianfinlayson.net)... 35.207.63.9
Connecting to ianfinlayson.net (ianfinlayson.net)|35.207.63.9|:80... connected.
HTTP request sent, awaiting response... 200 OK
Length: unspecified [text/html]
Saving to: ‘03-files2’

03-files2               [ <=>                ]  16.91K  --.-KB/s    in 0.03s

2018-07-31 12:17:38 (629 KB/s) - ‘03-files2’ saved [17313]
You would then have the HTML file downloaded into your home directory. This is more commonly done with .tar.gz files. For instance, if you want to download the code of a project to work on, you could use wget to do so.
Linux Filenames
There are some conventions to keep in mind when dealing with filename in Linux:
- As mentioned previously, files and directories that begin with a '.' character are hidden. This does not mean other users can't access them, but just that ls does not display them by default. You can make your own hidden files, if you want to.
- Linux is case sensitive which means the "file", "FILE", "FiLe" and "fIlE" are all separate files. This is not true on Windows or (usually) OSX. Nearly all system files are all lower-case, and I personally use this convention as well.
- You can put spaces and punctuation characters in filename, but it is generally a really bad idea as they have to be "escaped" which we will talk about, and can cause some programs to break. It's not worth it. If you have a file or directory that you want to be multiple "words", separate them with hyphens. For example, do not name a directory "My Documents". Instead call it "my-documents".
Accessing Files Remotely
Your files stored on the CPSC server are not directly accessible on your own computer. The file system on the server is totally separate from the one on your machine. So if you want to, for instance, email a file on the server, you can't directly do so.
What you can do is transfer files between your local computer and the server using a file transfer program. One free one which is easy to use is FileZilla.
Follow the steps below to transfer files to or from the server using FileZilla:
Install FileZilla
Follow the instructions here to install FileZilla on your computer. On Windows and OSX, this involves downloading an installer, running it, and following the prompts.
Warning: make sure that you install the client and not the server from the FileZilla website. The server will not help you and it will be super confusing.
For Linux, FileZilla is most easily installed via the package manager.
If you have any troubles installing it, please let me know. Again, make sure you have the client, and not the server.
Connect to cpsc.umw.edu
Run FileZilla and enter server information for the server in the fields at the top:
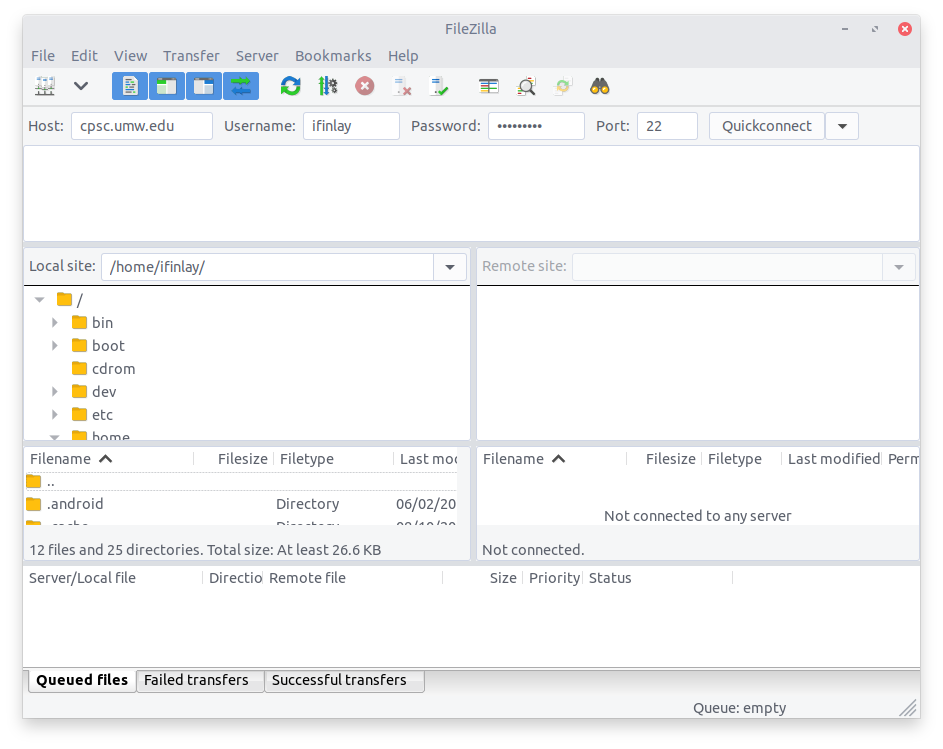
The Host should be the cpsc.umw.edu. The username and password are the same you use to login to the server normally, and the port should be 22.
Then click "Quickconnect".
FileZilla will ask if you want to save the password, which is up to you. It will also ask if you trust the connection. You should answer yes to that.
Drag and Drop Files
FileZilla lists your local files, the ones on your own machine, on the left. It lists the remote files, the ones stored on the server, on the right:

To transfer something to the server, drag and drop it from the local side to the remote side. To transfer something from the server to your own computer, drag from the remote side to the local one.
Connect Quickly Next Time
FileZilla will remember your connection so that you do not have to type the full information again. Click the little arrow next to the Quickconnect button to re-connect to a recent connection:

Transferring Files with scp
It is also possible to transfer files on the command line. You can do this from your local machine to the server if your local computer is running Linux or OSX, or if it is running Windows and you have WSL installed. You could also use it to transfer files between the server and another Unix server.
To transfer a file from your local machine to the server, you could use the following command:
[finlayson@magrathea ~]$ scp file.txt USER@cpsc.umw.edu:~
Substituting your username into the command, of course.
Note: these scp commands should be entered on
your local computer. Not on the cpsc.umw.edu server.
The first argument to scp is the source. The second is the
destination. Here, the destination is referencing a remote location. The ":"
separates the host name from the destination. The "~" says the destination is
the home directory. Altogether, this command will copy the local file.txt onto
the CPSC server in the home directory.
To transfer a file from the server onto your local machine, you could use:
[finlayson@magrathea ~]$ scp USER@cpsc.umw.edu:~/file.txt .
This says to transfer the "~/file.txt" file on the remote server into the ".", current directory.
If you have SSH keys setup, scp will use them to authenticate.
If not, it will ask for your password.