Chapter 10: Graphics
Learning Objectives
- Learn how to create graphics windows
- Understand the coordinate system used in graphics programs
- Learn how colors are created in a computer program
- Be able to create various graphics objects such as points, circles, lines and rectangles
- Learn how to handle mouse and keyboard input in a graphics program
10.1 Installing the PyGame Library
As we talked about in Chapter 8, we can add libraries to Python that other people have built and incorporate them into our own programs. One of these is the PyGame library which allows us to make graphical programs. We can use it to make games (hence the name), but it can also be used for other graphical programs such as simulations, or just having more colorful output.
To install it with Thonny, choose “Tools -> Manage Packages” from the main menu. Then search for “pygame” in the window that comes up:
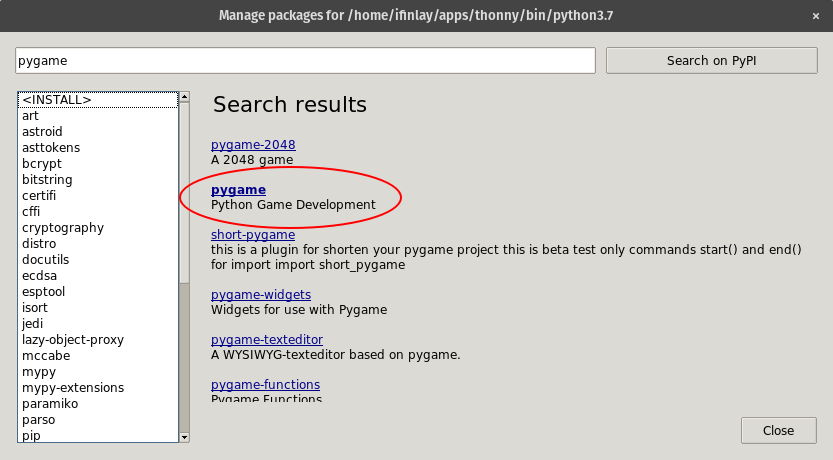
The one we want is just called “PyGame”, so click on that. Next click the Install button:

It will take a moment or two to download. When it is finished, you should have PyGame installed and be ready to write and run graphical programs.
10.2 PyGame Basics
The first thing we need to do is import the PyGame library. Recall
from Chapter 8 that this can be done with the
import command:
import pygameNext, we need to call the PyGame init() function which
sets up the library, initializing it so we can call upon the other
functions:
pygame.init()Now we can create a window. All of the programs we have written up to this point have printed their results to the shell window. The shell is purely textual, so to draw shapes, images, and other graphical things, we need a window to put them in. We can create a window with this line of code:
window = pygame.display.set_mode([800, 600])This set_mode function creates the window for us. Its
parameter is a list containing two numbers. The first number is how wide
the window should be and the second is how tall it should be.
These numbers refer to pixels, which is short for “picture elements”. All computer screens are made up of tiny lights that can show up as different colors. These are called pixels. Your computer monitor or laptop screen may have more or less pixels in it. A pretty typical display these days might be 1,920 pixels wide and 1,080 pixels tall. In this case, our 800x600 window takes up around a quarter of the screen.
The window is where all of the things we draw will show up. Before we can start talking about drawing things into the window, we need to discuss how color is represented in computer programs.
10.3 Colors
Just like everything else in computers, colors are ultimately stored as numbers. The way this works is that we have three numbers for every color: one for the amounts of red, green, and blue in the color1. Each of these three numbers ranges from 0 to 255. The 255 limit may seem random, but that is the largest number that can fit in one byte. 0 means there is none of that color at all, and 255 means that color is turned up to the max.
For example, we could make a color with 100 for red, 240 for green and 215 for blue. This would be a light aquamarine sort of color like this . The easiest way to explore colors like this is probably to Google “color picker” and play with Google’s built in color choosing tool. At the bottom left, you will see the label “RGB” which indicates the three color components. This will let you find the numbers for any color you want2.
Colors are put into programs with tuples which are sort of like lists in Python except they use parentheses instead of square brackets. The other difference is tuples can’t be changed once they are created, while lists can. We can assign our aquamarine color into a variable like this:
aqua = (100, 240, 215)The numbers are always listed in the order of red, green, and then blue. Here are some definitions for other common colors:
red = (255, 0, 0)
green = (0, 255, 0)
blue = (0, 0, 255)

white = (255, 255, 255)
black = (0, 0, 0)
grey = (128, 128, 128)

yellow = (255, 255, 0)
orange = (255, 128, 0)
pink = (255, 0, 255)
purple = (128, 0, 255)
10.4 Our First Graphical Program
Now that we can create colors, we can create a complete program using PyGame. The code for it is given first, then we will discuss it:
import pygame

# setup PyGame
pygame.init()

# create a window
window = pygame.display.set_mode([800, 600])

# set some colors
white = (255, 255, 255)
orange = (255, 128, 0)

while True:
    # fill the window with a white color
    window.fill(white)

    # draw an orange circle in the window
    pygame.draw.circle(window, orange, (400, 300), 100)

    # flip the window
    pygame.display.flip()
We start by importing the PyGame library, calling the
init() function for it, and creating our window like
before. Next we define two colors for use in the program, a white for
the background and an orange for a circle. Of course we can change this
to be whatever we want!
The rest of the program takes place in a while loop. Graphics programs pretty much always have a main loop in them that keeps the program running. If we didn’t have a loop, the window would pop up briefly when the program is run and close again when the program ends. Here the while loop is an infinite one. To end this program, you’ll have to hit Thonny’s “stop” button. Ideally, the program would end when the user hits the ‘X’ to close the window instead. We’ll see how to do that in a little bit.
Inside the loop, we do three things. First we fill the window with a
white color by calling .fill() on the window and passing
the color we want it filled with.
Secondly, we draw an orange circle in the middle of the window. This
is done using pygame.draw.circle() which takes 4
parameters. The first is what window we want the circle drawn into. Next
is the color we want the circle to appear as. After that we give it the
coordinates of where the center of the circle should appear. We talk
about coordinates in the next section, but (400, 300) is the middle of
our 800x600 window. Finally we pass 100 as the radius of the circle.
The third thing we do inside the loop is to “flip” the display. PyGame, like most graphical systems, uses a technique called page flipping. This means there are actually two graphical areas we create: the one being shown to the user and the one being drawn on. When we draw things like the orange circle, it gets drawn to the “back” display which isn’t visible. Then when we are done drawing everything, we flip the displays so the user sees the new scene all at once. This prevents the user from seeing a half-drawn scene which won’t look right.
10.5 Coordinate Systems
Before we go much further, we need to talk about the coordinate system used in computer graphics. What does it mean when we put in (400, 300) for the circle’s location?
Graphics systems typically use a coordinate system that is different from that used by mathematics. In graphics, the origin, (0, 0) is at the upper left corner of the window. The first coordinate, the X coordinate, increases as we go from left to right. The second, or Y, coordinate increases as we go from top to bottom (which is normally the opposite in math).
This image illustrates the coordinate system:
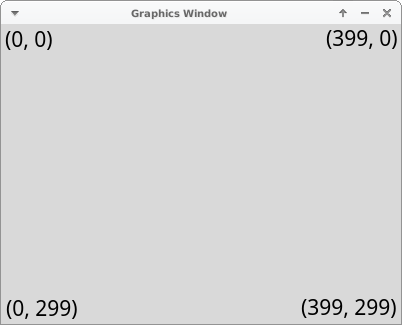
This image shows the coordinates of each of the four corners of the window. Notice that, like string indices, we start counting at pixel 0 and not pixel 1. Here, the window is 400 by 300 pixels large. That means there are 120,000 pixels.
10.6 Events
Having to end the program through Thonny is not ideal. The user should be able to end the program by clicking the ‘X’ in the window bar like usual. To do this, we need to look for the quit event. An event is just something that might occur while our program is running, like the user clicking the close button, pressing a key on the keyboard or clicking the mouse.
By checking for these events, we can make our program respond to what
the user is doing. PyGame has a function called
pygame.event.get() which returns back a list of all the
events that have occurred since the last time we called it. We can then
loop through this list and respond to the events that we get.
This version of the program checks for the quit event. It uses a
boolean variable to keep track of whether the program is still running.
When the quit event is encountered, this variable is set to False. We
also call pygame.quit() at the end of the program.
import pygame

# setup PyGame
pygame.init()

# create a window
window = pygame.display.set_mode([800, 600])

# set some colors
white = (255, 255, 255)
orange = (255, 128, 0)

running = True
while running:
    # check for events
    for event in pygame.event.get():
        if event.type == pygame.QUIT:
            running = False

    # fill the window with a white color
    window.fill(white)

    # draw an orange circle in the window
    pygame.draw.circle(window, orange, (400, 300), 100)

    # flip the window
    pygame.display.flip()

pygame.quit()
Now the program should close the window and stop running when the user clicks the close button on the window bar.
10.7 Keyboard and Motion
We can get user input from the keyboard or the mouse using this
method as well. To check if a key is pressed, we can detect the
KEYDOWN event. Then we can check which key was
pressed by checking event.key
For example, we could let the user also quit the program by hitting
the Escape key. To do this, we can add an elif to the code
checking what type of event was received. If it was a
KEYDOWN event, then we can check which key was pressed. If
it was Escape, we can also set running to
False. The full list of keys is available here. The
code for implementing this:
for event in pygame.event.get():
    # check what type of event it was
    if event.type == pygame.QUIT:
        running = False
    elif event.type == pygame.KEYDOWN:
        # check which key got pressed
        if event.key == pygame.K_ESCAPE:
            running = False
Another thing we can do with this is to let the user move the orange circle around with the arrow keys. To do this, we can start by storing the position of the circle in variables. That way we can change those variables when the keys are pressed:
# the position of the circle
x = 400
y = 300
Then when we draw the circle, we’ll use these variables for the position:
pygame.draw.circle(window, orange, (x, y), 100)Notice that we still need the extra parentheses because the position
is passed as a tuple. Now if we change the x or
y variables, the change will affect where the circle gets
drawn to. We can do this by adding in code to change these variables
when the arrow keys are pressed. The full code for this would look like
this:
import pygame

# setup PyGame
pygame.init()

# create a window
window = pygame.display.set_mode([800, 600])

# set some colors
white = (255, 255, 255)
orange = (255, 128, 0)

# the position of the circle
x = 400
y = 300

running = True
while running:
    # check for events
    for event in pygame.event.get():
        if event.type == pygame.QUIT:
            running = False
        elif event.type == pygame.KEYDOWN:
            # check which key got pressed
            if event.key == pygame.K_ESCAPE:
                running = False
            elif event.key == pygame.K_UP:
                y = y - 10
            elif event.key == pygame.K_DOWN:
                y = y + 10
            elif event.key == pygame.K_LEFT:
                x = x - 10
            elif event.key == pygame.K_RIGHT:
                x = x + 10

    # fill the window with a white color
    window.fill(white)

    # draw an orange circle in the window
    pygame.draw.circle(window, orange, (x, y), 100)

    # flip the window
    pygame.display.flip()

pygame.quit()
We add or subtract 10 pixels from one of x or
y when an arrow key is pressed. Note that when up is
pressed we subtract 10 pixels. That’s because Y gets smaller towards the
top of the window (which can be confusing at first).
If you were using this approach to keyboard input and movement to make something like a game, it would not really be ideal. Rather than have to press they right key over and over to move the circle to the right, we might like to hold the right key to have it continually move right.
To do this, we will need to look for both the key pressed and key released events. When an arrow key is pressed, we can set the circle in motion. When the arrow key is released we stop its motion. To this end, we’ll create two new variables for the circle. One keeps track of its speed in the x direction and the other is the speed in the y direction. These start off at 0 to mean the circle isn’t moving to start off.
xspeed = 0
yspeed = 0
We’ll also make a variable for how fast the circle goes when it is moving:
movementSpeed = 1Next we will check for both types of key events (presses and
releases) and set the xspeed and yspeed
variables based on that:
# a key was pressed down
elif event.type == pygame.KEYDOWN:
    if event.key == pygame.K_ESCAPE:
        running = False
    elif event.key == pygame.K_UP:
        yspeed = -movementSpeed
    elif event.key == pygame.K_DOWN:
        yspeed = movementSpeed
    elif event.key == pygame.K_LEFT:
        xspeed = -movementSpeed
    elif event.key == pygame.K_RIGHT:
        xspeed = movementSpeed

# a key was resleased
elif event.type == pygame.KEYUP:
    if event.key == pygame.K_UP or event.key == pygame.K_DOWN:
        yspeed = 0
    elif event.key == pygame.K_LEFT or event.key == pygame.K_RIGHT:
        xspeed = 0
When an arrow key is pressed down, we set the xspeed or
yspeed variable to either positive or negative
movementSpeed. Which one depends on which key it was. For
the right arrow key, we want it to move right so we set
xspeed to positive movementSpeed which will
indicate the circle moves up in the X coordinate.
When an arrow key is released, we set the xspeed to 0
when it was the left or right keys, which stop its side to side
movement. And if the up or down keys are released it stops moving up or
down, so we set the veritcal yspeed to 0.
Now the only thing to do is to take the speeds and use them to change the position of the circle. We can do that with this code:
# move the circle
x = x + xspeed
y = y + yspeed
This adds the speed into each of the two coordinates. So the way this
works is the user presses an arrow key, let’s say the right key. This
sets xspeed to positive 1. Every time through the loop, the
1 is added into x. So each time through it moves 1 pixel to
the right. When the user releases the right key, xspeed is
set back to 0. Then the x coordinate will no longer have
anything added to it, so the circle stops.
The full code for this example follows:
import pygame

# setup PyGame
pygame.init()

# create a window
window = pygame.display.set_mode([800, 600])

# set some colors
white = (255, 255, 255)
orange = (255, 128, 0)

# the position of the circle
x = 400
y = 300

# the current speed of the circle
xspeed = 0
yspeed = 0

# how fast the circle can go when moving
movementSpeed = 1

running = True
while running:
    # check for events
    for event in pygame.event.get():
        if event.type == pygame.QUIT:
            running = False

        # a key was pressed down
        elif event.type == pygame.KEYDOWN:
            if event.key == pygame.K_ESCAPE:
                running = False
            elif event.key == pygame.K_UP:
                yspeed = -movementSpeed
            elif event.key == pygame.K_DOWN:
                yspeed = movementSpeed
            elif event.key == pygame.K_LEFT:
                xspeed = -movementSpeed
            elif event.key == pygame.K_RIGHT:
                xspeed = movementSpeed

        # a key was resleased
        elif event.type == pygame.KEYUP:
            if event.key == pygame.K_UP or event.key == pygame.K_DOWN:
                yspeed = 0
            elif event.key == pygame.K_LEFT or event.key == pygame.K_RIGHT:
                xspeed = 0

    # move the circle
    x = x + xspeed
    y = y + yspeed

    # fill the window with a white color
    window.fill(white)

    # draw an orange circle in the window
    pygame.draw.circle(window, orange, (x, y), 100)

    # flip the window
    pygame.display.flip()

pygame.quit()
10.8 Drawing More Things
Besides just circles, we can draw other shapes as well. The following program draws a number of shapes to a window:
import pygame
import math

pygame.init()

window = pygame.display.set_mode([800, 600])

running = True
while running:
    for event in pygame.event.get():
        if event.type == pygame.QUIT:
            running = False

    # Fill the background with light grey
    window.fill((240, 240, 240))

    # a red rectangle
    pygame.draw.rect(window, (255, 0, 0), pygame.Rect(50, 50, 150, 100))

    # a green ellipse
    pygame.draw.ellipse(window, (0, 255, 0), pygame.Rect(400, 100, 300, 200))

    # a blue polygon
    pygame.draw.polygon(window, (0, 0, 255), [(100, 300), (200, 300), (250, 350), (150, 400), (15, 350)])

    # an orange line
    pygame.draw.line(window, (255, 128, 0), (100, 500), (400, 550), 4)

    # a purple arc
    pygame.draw.arc(window, (150, 0, 180), pygame.Rect(500, 400, 100, 100), 0, math.pi/2)

    # Flip the display
    pygame.display.flip()

# Done! Time to quit.
pygame.quit()
The rectangle is drawn with:
pygame.draw.rect(window, (255, 0, 0), pygame.Rect(50, 50, 150, 100))Just like when drawing the circle, the first parameter is the window
to draw the rectangle to and the second is the color it should be. The
third parameter is the rectangle to draw. The pygame.Rect
function creates a rectangle given four parameters. They are:
- x coordinate
- y coordinate
- width
- height
Drawing an ellipse is done in a similar way. We used this code to draw a green ellipse:
pygame.draw.ellipse(window, (0, 255, 0), pygame.Rect(400, 100, 300, 200))The parameters here mean the exact same thing. The only difference is that the ellipse will be drawn inside the rectangle shape which is given.
Drawing a polygon is done with this line of code:
pygame.draw.polygon(window, (0, 0, 255), [(100, 300), (200, 300), (250, 350), (150, 400), (15, 350)])Again the first two things are the window to draw to and the color. Then the function takes a list of points which give the coordinates of the points in the polygon.
A straight line can be drawn with code like this:
pygame.draw.line(window, (255, 128, 0), (100, 500), (400, 550), 4)After passing the window and the color for it, we pass two points which give the ending points for the line. The last parameter is optional and gives the thickness of the line.
Finally we can draw a curved line, called an arc with:
pygame.draw.arc(window, (150, 0, 180), pygame.Rect(500, 400, 100, 100), 0, math.pi/2)We pass the window and the color first. Next comes a rectangle which bounds where the arc will be drawn (just like an ellipse). The last two parameters are angles measured in radians. These two angles specify the start and end angle for the arc.
10.9 Drawing Images
In addition to drawing these shapes, we can also load images from a
file and draw them to the window too. The first step in doing this is to
load the image file from your computer. We can do this with the
pygame.image.load function:
picture = pygame.image.load("campus.png")For this to work, the image file has to be in the same folder as your Python program is saved to. PyGame can load several types of images including PNG and JPG. Once the image is loaded into a variable, we can draw it using code like this:
window.blit(picture, (0, 0))Instead of passing the window into a draw method, like for drawing
shapes, here we call blit on the window itself3. The second parameter is where in
the window the upper-left corner of the image should appear. Here we
pass the origin (0, 0) so that the picture fills the whole window. You
can download campus.png to run the
program.
10.10 Comprehension Questions
- How do computers represent color?
- What is a tuple and how is it different from a list?
- What does “page flipping” refer to?
- Where is the origin point in a computer graphics window?
- What is a pixel?
- How does PyGame handle events like the user clicking a mouse or quitting?
10.11 Programming Exercises
Write a program which draws your initials on the screen using lines. If you have a “curvy” initial, you don’t have to make it appear round. For example, an S can be made out of just three lines. But if, you want to be ambitious, you can use the pygame.draw.arc function to make curves.
Write a program where you draw a randomly colored rectangle to the screen.
Modify the last program so that whenever the user clicks the rectangle it changes color.
Write a program in which ball moves around the screen. When it hits the edge, you should have it bounce back. This can be done by keeping track of four variables: the ball’s X and Y coordinates, and the change in the ball’s X and Y coordinates, which we can call DX and DY. Each time through the main loop, add the DX into the X and DY into the Y. If we need the ball to move right DX will be positive. If it needs to bounce back to the left, we set DX to be negative.
Expand the previous program to be a simple Pong game, by adding two rectangles which represent the player and computer paddles. One paddle should be moved when the up and down keys are pressed. The other can move however you like: up and down forever, randomly, or by tracking the ball.
Chapter Summary
- PyGame is a library that we can install which allows us to create graphical programs. It can be installed like other libraries in Python.
- Screens are made up of pixels, each of which can store a single color.
- Colors are made up of three components: red, green, and blue. By setting each of these components we can create effectively any color there is.
- Computer screens use a coordinate system where the origin point is the upper left-hand corner. The X coordinate increases as we go to the right and the Y coordinate increases as we go down.
- Graphical programs often use events to handle interaction with the user. Our programs wait for events to occur instead of actively ask the user for input.
- PyGame has built in functions for drawing all kinds of geometric shapes, and also images.
Footnotes
In school you learned that red, yellow and blue are the three primary colors. That’s true in a subtractive model of color, such as you get when mixing paints together. But there are other models of color, such as the additive model wherein you combine colored lights. In this model red, green, and blue are the three primary colors. Shining a red light and a green light together actually makes a yellow light!↩︎
With this color scheme, there are actually over 16 million colors we could create. The human eye can only discern about 10 million different colors. So while theoretically there’s really no limit on the number of colors, we can practically make any color we can imagine.↩︎
The term “blit” is an old phrase in graphics and game programming. Its origin is an acronym for BLock Information Transfer. To blit something is to transfer it quickly from one part of memory to another. When you draw an image, you copy the image data onto the screen.↩︎