Unit Testing
Overview
Testing is an important part of developing software. Because programs almost never work correctly the first time, we will constantly be testing our code to discover bugs.
We can test smaller programs simply by running them on different inputs. However, as projects get larger, this becomes more difficult for a few reasons:
- As more features are added, there's more things we'd need to test each time we run a program.
- Some scenarios are difficult to produce naturally. For example, if we're working on a blackjack card game, we might want to test that the scoring works when our hand contains two aces. However, it might take many runs before this actually happens.
- Oftentimes we won't be working on an actual program, but rather writing classes that others can build programs off of.
Instead we will write unit tests which are tests that we write alongside the code we are working on. The idea is that as we write a class, we also write code that automatically tests the methods of it. We can then run the tests automatically. If one or more fails, we will be alerted.
One huge benefit of having unit tests is that they catch regressions. A regression is when something that was working, stops working. Fixing bugs or adding new features to a program can unfortunately sometimes cause this to happen. With unit tests, you will be notified right away if a test for something begins to fail.
There are several ways of doing unit testing. The most popular system for Java is called JUnit.
JUnit Setup
Let's say we have the following QuizList class which stores a list of quiz scores:
import java.util.*;

public class QuizList {
    private ArrayList<Integer> numbers = new ArrayList<>();

    public void add(int number) {
        numbers.add(number);
    }

    public int length() {
        return numbers.size();
    }

    // drop the lowest grade out of the list
    public void dropLowest() {
        if (numbers.size() == 0) {
            throw new IllegalStateException("Cannot drop from empty list");
        }

        Collections.sort(numbers);
        numbers.remove(0);
    }

    // return the average of the numbers back
    public double average() {
        if (numbers.size() == 0) {
            throw new IllegalStateException("An empty list has no average");
        }

        int sum = 0;
        for (int i = 0; i < numbers.size(); i++) {
            sum += numbers.get(i);
        }

        return (double) sum / (double) numbers.size();
    }
}
We can create unit tests so that we can make sure these methods actually work. To do this with JUnit and IntelliJ:
- Right click on the name of our class. Then click "Generate..." and the "Test".
- When it asks if we want to put the tests in the same source root, we can say yes. It's common to have a separate directory for source files and tests, but for now we can put them together.
- Be sure to choose "JUnit5" in the dialog that opens. It will say that the JUnit5 library is not in the module. Click the "Fix" button and then "OK" to download the library into the project.
- Click the checkboxes for all of the methods we want to create tests for. In this case that'll
be just
dropLowestandaverage. - That should make a new source file called "QuizListTest.java: with methods for testing each of the methods in our QuizList class. It will give an error on the line importing JUnit. Take IntelliJ's suggestion to add the library to the class path.
Writing Unit Tests
Now we can actually write the test methods. For the average method, we can do something like this:
  @org.junit.jupiter.api.Test
    void average() {
        QuizList q1 = new QuizList();
        q1.add(5);
        q1.add(3);
        q1.add(9);
        q1.add(3);
        assertEquals(5, q1.average());

        QuizList q2 = new QuizList();
        q2.add(10);
        assertEquals(10, q2.average());

        QuizList q3 = new QuizList();
        q3.add(7);
        q3.add(11);
        q3.add(8);
        assertEquals(8.66666, q3.average(), .001);

        QuizList q4 = new QuizList();
        assertThrows(IllegalStateException.class, q4::average);
    }
The purpose of this method is to test the average method
in a couple scenarios. We make a few QuizList objects, add
some data into them and then use the JUnit assertEquals
method to verify that the expected result is what we actually get.
In the test methods, you should try to hit several cases. If there are any special cases in the code, you should include them.
The first two tests here are pretty straightforward. We check that the
average computed is what it should be. If assertEquals is
given two different values, it will count as a failed test.
The third call to assertEquals passes a third parameter
which is a delta value. This is the amount of error that is acceptable
in a floating point comparison. Floating point values are only approximations and
it's generally not a good idea to check if one double is exactly equal to
another. Here we can't check if the average is exactly eight and two thirds, so
we just check that it's within one one thousandth.
In the fourth test we are actually checking that an exception will be thrown
when the average method is called on an empty list. This uses the assertThrows
method. The syntax of this is a little different. The first parameter is the class of the
exception we expect should be thrown. The second is the method call which should produce
the exception. Here we pass the method to call (instead of actually calling it).
We can do similar things to test the dropLowest method:
    @org.junit.jupiter.api.Test
    void dropLowest() {
        QuizList q1 = new QuizList();
        q1.add(10);
        q1.add(3);
        q1.add(9);
        q1.add(8);
        q1.add(4);
        q1.dropLowest();
        assertEquals(4, q1.length());

        QuizList q2 = new QuizList();
        q2.add(5);
        q2.dropLowest();
        assertEquals(0, q2.length());
        assertThrows(IllegalStateException.class, q2::dropLowest);

        QuizList q3 = new QuizList();
        q3.add(10);
        q3.add(10);
        q3.add(10);
        q3.add(9);
        q3.add(10);
        q3.add(10);
        q3.add(10);
        assertEquals(10, q3.average());
    }
Here we put in several tests that the lowest grade is dropped under different scenarios.
Running Unit Tests
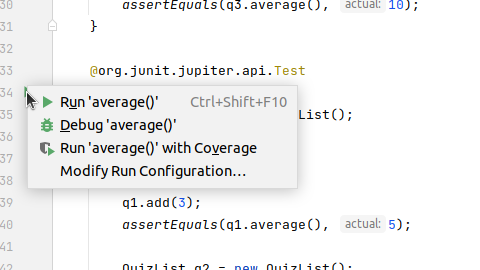
Now we can run the tests that we've written. We can run individual tests by clicking on the green arrows next to them in IntelliJ:
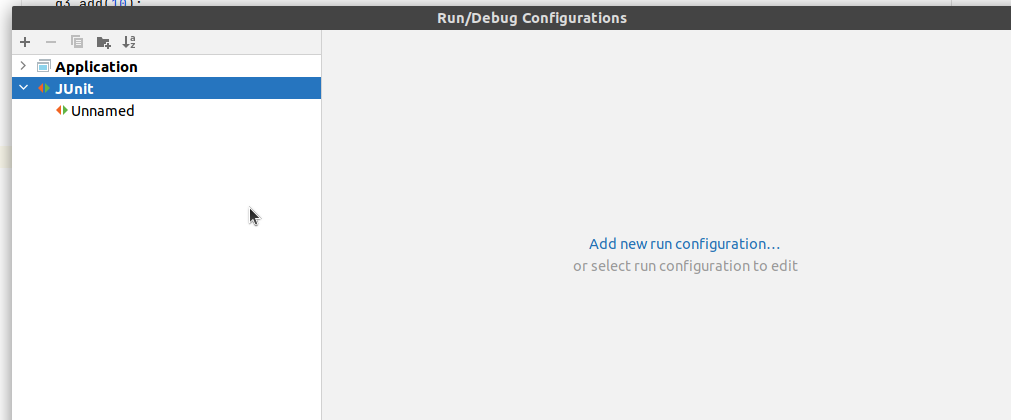
We can also run all of the tests by adding a JUnit run configuration:
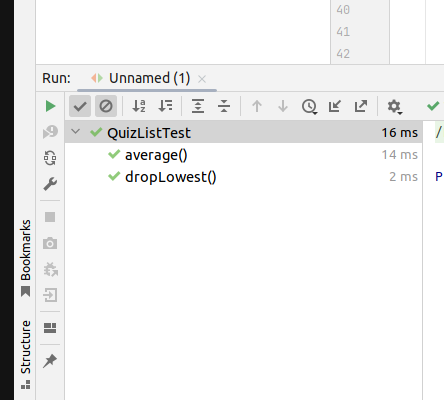
When the tests are finished, they will then show if they have all succeeded or not. When they have you can see that that's the case:
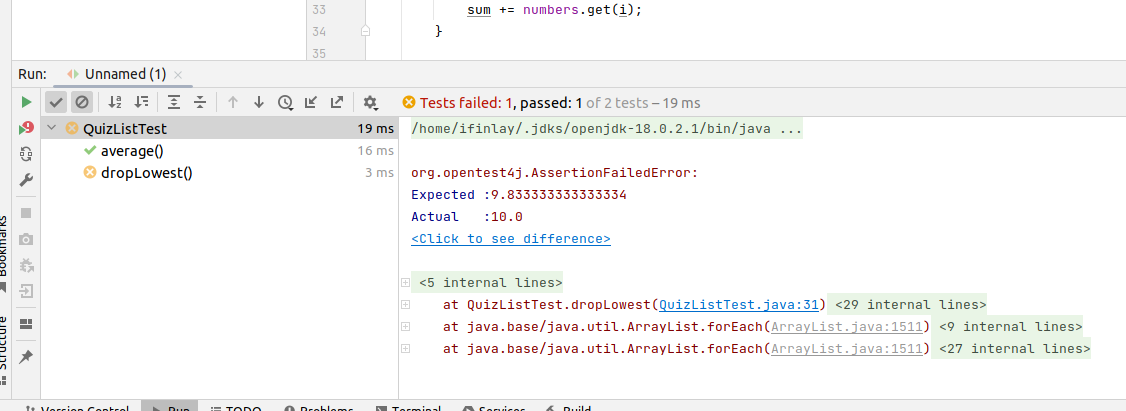
However if we introduce a bug into the code, the test will begin to fail:
When using unit tests, we'll keep the tests around throughout the whole development of the program. Every so often, we will run all of the unit tests that we have. That way if any part of our program has developed a bug we will know right away.