All the programs we've written so far have been command-line programs where the user
interacts with our program through text only. We show textual output with System.out
and take textual input by reading from System.in.
We can also create Graphical User Interface (GUI) programs. These will open windows that the user can interact with using the mouse and contain menus, buttons, check boxes, etc. There are two major GUI systems available for Java. We will use Swing which comes with Java, is older and more widely used. There is also JavaFX which is newer, but has not been widely adopted. IntelliJ is built using Swing.
Below is a simple program written in Java Swing:
import javax.swing.*;

public class ButtonExample {
    public static void main(String[] args) {
        // create and set up the window.
        JFrame frame = new JFrame("Button Example!");

        // make the program close when the window closes
        frame.setDefaultCloseOperation(JFrame.EXIT_ON_CLOSE);

        // add a button object
        JButton button = new JButton("Push Me!");
        frame.getContentPane().add(button);

        // display the window.
        frame.pack();
        frame.setVisible(true);
    }
}
When we run this program it will open up a window containing a button.
The window is created using a JFrame object. The constructor
for the frame takes the title of the window, which is visible in the top
bar.
By default the window will not close when the user clicks on the little
'X' button in the title bar. The setDefaultCloseOperation
method allows us to change what happens when the close button is pressed.
We then add a JButton object to the frame. The constructor
takes the text that should appear on the button. We then add the button
object to the windows "content pane" which is the area inside the window
that we can put things in (it is the part of the window excluding the title
bar or menu bar).
Finally we call the window's pack method which sets the size
of the window to be just large enough to contain what we put in it. We could
instead call .setSize(width, height) to size it. Then the
setVisible method shows the window.
Notice that this program does not have a loop or anything like that in it. In a normal program, when we reach the end of the main method, the program would be over. But our window stays open until the user closes it. The reason is that Swing creates a new thread to handle the windows. Even though our programs thread is done, the GUI thread is still running. We'll talk more about threads in a few weeks.
When we click on the button in the window from the program above, nothing actually happens. We need to tell Swing what to do when the button is pressed. This is done using event-driven programming which is a bit different than the style of programming we've done so far. So far our programs have begun in main and we have written code to direct everything that happens in the order we want. However we won't write code like this:
    if (button.clicked()) {
        // do something
    }
In event-driven programming, we just say what should happen when different events occur. Then the system itself manages the interface and tracks what the user does. When a button is clicked, or text is entered, Swing will call upon the code we gave it to respond to the event which occurred.
This is done using interfaces. There are several interfaces that come with
Swing which we can implement. One is ActionListener which contains
a method called actionPerformed. By implementing this method, we
can make a class that can respond to an event in order to perform whatever action
we want.
We can then pass an object of our class into the addActionListener
method of the button. Then when the button detects that it has been clicked, it
can call upon the actionPerformed method we gave it. Code that does this is here:
import javax.swing.*;
import java.awt.event.*;

class ButtonListener implements ActionListener {
    @Override
    public void actionPerformed(ActionEvent e) {
        JOptionPane.showMessageDialog(null, "You pushed the button!!");
    }
}

public class EventExample {
    public static void main(String[] args) {
        // create and set up the window.
        JFrame frame = new JFrame("Button Example!");

        // make the program close when the window closes
        frame.setDefaultCloseOperation(JFrame.EXIT_ON_CLOSE);

        // add a button object
        JButton button = new JButton("Push Me!");
        button.addActionListener(new ButtonListener());
        frame.getContentPane().add(button);

        // display the window.
        frame.pack();
        frame.setVisible(true);
    }
}
Here the action listener just opens up a message box to show that something happened.
In the code above the ButtonListener class only exists to override the actionPerformed method. We will only ever make one ButtonListener object, and its whole job is just to respond to events from one button. Java has alternate syntax we can use to accomplish this. It looks like this:
        // add a button object
        JButton button = new JButton("Push Me!");
        button.addActionListener(new ActionListener() {
             @Override
             public void actionPerformed(ActionEvent e) {
                 JOptionPane.showMessageDialog(null, "You pushed the button!!");
             }
         });
        frame.getContentPane().add(button);
Here we are actually making what's called an "anonymous inner class". This code makes a new object and specifies the class for it (without a name) at the point in which it makes the object. It then overrides the method as part of that.
The downside of this is that's its ugly and perhaps confusing. The upside is that it means we don't need to create a whole class whose whole purpose is to respond to just one button. The examples that follow will use the approach where we create the class the normal way. But you will see examples like this and can use it if you like.
If we modify the code above to add a second button to the window, what happens? If you try it, you will see that only the second one will be visible and the first one will disappear. The way that Swing works is that if we want our window to have multiple components, we need to provide a Layout object which controls how they will be arranged.
There are several layouts to choose from. You can see the options and what they look like at the Guide to Layout Managers. The below example uses a BoxLayout, which is the simplest. This layout arranges components in a row either horizontally or vertically.
import javax.swing.*;
import java.awt.event.*;

class ButtonListener implements ActionListener {
    // each button listener stores the name of the button
    private String text;

    // given the text when it's created
    public ButtonListener(String t) {
        text = t;
    }

    @Override
    public void actionPerformed(ActionEvent e) {
        JOptionPane.showMessageDialog(null, "You pushed button " + text);
    }
}

public class LayoutExample {
    public static void addButton(String text, JFrame f) {
        // add a button object
        JButton button = new JButton(text);
        button.addActionListener(new ButtonListener(text));
        f.getContentPane().add(button);
    }

    public static void main(String[] args) {
        // create and set up the window.
        JFrame frame = new JFrame("Button Example!");

        // make the program close when the window closes
        frame.setDefaultCloseOperation(JFrame.EXIT_ON_CLOSE);

        // create the box layout
        frame.getContentPane().setLayout(new BoxLayout(frame.getContentPane(), BoxLayout.Y_AXIS));

        // add some buttons
        addButton("A", frame);
        addButton("B", frame);
        addButton("C", frame);
        addButton("D", frame);

        // display the window.
        frame.pack();
        frame.setVisible(true);
    }
}
Notice that in this program, we also created a method to add the different buttons to our window. That reduces the duplication of copy/pasting the same code four times. Also we are making four ButtonListener objects, one for each button. We pass data into the ButtonListener so it knows which button it's associated with. The ButtonListener can have other methods and instance variables in addition to overriding the actionPerformed method!
We can also add a menu bar (the thing that typically has "File", "Edit" and "View" menus)
to our Swing programs. This is done by creating a JMenuBar object and then adding
JMenu objects to it. Finally we can add JMenuItem objects to the
menu. These three different components are visible in this example from IntelliJ:
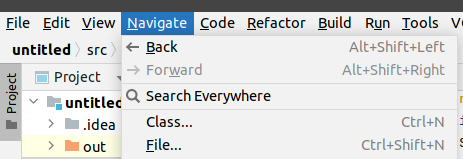
Here the "menubar" is the entire thing containing "File", "Edit", etc. The "menu" is each one of those. Here I've clicked on the "Navigate" menu. Then the "menu items" are the things under each menu, such as "Back", "Search Everywhere", "Class", etc.
Notice too that there are keyboard shortcuts for each of these things. These are called "mnemonics" in Swing terms. The code below makes a simple menubar with mnemonics:
import java.awt.event.*;
import javax.swing.*;

// this class contains the method called when the exit choice is picked
class ExitListener implements ActionListener {
    @Override
    public void actionPerformed(ActionEvent e) {
        System.exit(0);
    }
}

public class MenuExample {
    public static void main(String[] args) {
        JFrame frame = new JFrame("Menu Example!");
        frame.setDefaultCloseOperation(JFrame.EXIT_ON_CLOSE);

        // create the menu bar
        JMenuBar menubar = new JMenuBar();

        // add the file menu
        JMenu file = new JMenu("File");
        file.setMnemonic(KeyEvent.VK_F);

        // add a menu item
        JMenuItem exit = new JMenuItem("Exit", null);
        exit.setMnemonic(KeyEvent.VK_E);
        exit.setToolTipText("Exit the program");

        // add the action as a new anonymous object
        exit.addActionListener(new ExitListener());
        file.add(exit);

        // add file to the menubar
        menubar.add(file);

        // add the menubar to the window
        frame.setJMenuBar(menubar);

        // set other things
        frame.setTitle("Simple menu");
        frame.setSize(300, 200);

        // launch the windwo
        frame.setVisible(true);
    }
}
We can to some degree customize the way the Swing components look. This is done by setting the Swing "look and feel". There are different options available on different operating systems. The program below prints the names of all the available look and feels to the console. It then sets the system look and feel which is the one Swing thinks looks the most like the operating system you are on:
import javax.swing.*;
import java.awt.event.*;

class ButtonListener implements ActionListener {
    @Override
    public void actionPerformed(ActionEvent e) {
        JOptionPane.showMessageDialog(null, "You pushed the button!!");
    }
}

public class LookAndFeels {
    public static void main(String[] args) {
        // list all of the look and feel options we have
        UIManager.LookAndFeelInfo[] options = UIManager.getInstalledLookAndFeels();
        for (UIManager.LookAndFeelInfo option : options) {
            System.out.println(option.getClassName());
        }

        // set the look and feel
        try {
            // this attempts to pick the best look and feel for the user's system
            UIManager.setLookAndFeel(UIManager.getSystemLookAndFeelClassName());
        } catch(Exception e) {
            System.out.println("Could not set the look and feel.");
            // we could also try and set a second option here
        }

        // create and set up the window.
        JFrame frame = new JFrame("Button Example!");

        // make the program close when the window closes
        frame.setDefaultCloseOperation(JFrame.EXIT_ON_CLOSE);

        // add a button object
        JButton button = new JButton("Push Me!");
        button.addActionListener(new ButtonListener());
        frame.getContentPane().add(button);

        // display the window.
        frame.pack();
        frame.setVisible(true);
    }
}
We can also change the look and feel to a specific option with code like this:
UIManager.setLookAndFeel("javax.swing.plaf.metal.MetalLookAndFeel");
The examples above display particular features or concepts of Swing programs. As an example that uses many of these things to build something more substantial, here is a Swing GUI Calculator program.
It contains a ButtonListener class that works for any of the buttons. It stores an enum representing which button it is for. Then based on that, its actionPerformed method does different things.
There is also a class called Calculator which extends a JLabel. A Label is just a piece of text which can be added to the window. This is the text which displays what the calculator is doing. This class handles the actual computations done by the calculator.
Finally we have the CalculatorGui class which contains the main method to build the user interface. This contains nested layouts. The main layout is a vertical box layout. The first thing is the label, then a grid layout of 16 buttons, and finally a horizontal box layout with two more buttons.
Copyright © 2024 Ian Finlayson | Licensed under a Creative Commons BY-NC-SA 4.0 License.